Third Party Press

Project 41: Resurrecting the Mighty Walther

GunKraut

Senior Member
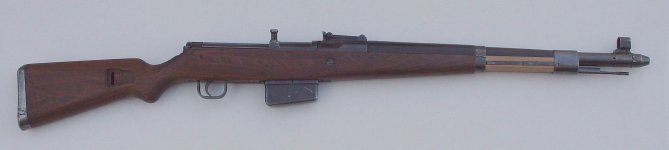
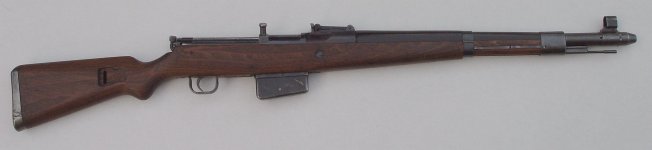
Occasionally I run into interesting things which need some time to start growing on me. One such thing is the G41, the Mighty Walther, an important step towards the development of the G43. Generally, I'm more of a K98 and G43 person because I prefer rifles I can take to the range and fire all day long without problems. According to what I read and heard, the Mighty Walther was quite the opposite of my general preference. G41's are regarded as finicky, unreliable, said to foul and break easily and parts are hard to come by; overall something I should stay away from. Oh, and they are said to be awfully expensive.

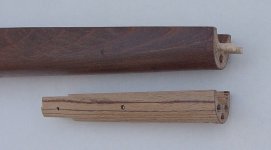
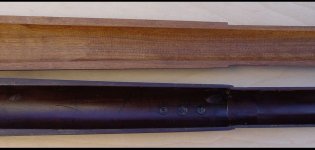
Lucky me, I found a "sporterized" 1943 G41 a-block for little money. The fore end had been chopped off and lost, upper hand guard, both barrel bands, bayonet lug and band spring were missing as well. All parts including the mutilated stock had matching serial numbers and were well cared for, all metal parts were clean and oil coated without any trace of rust. The bore was good and the gas system without the usual corrosion.

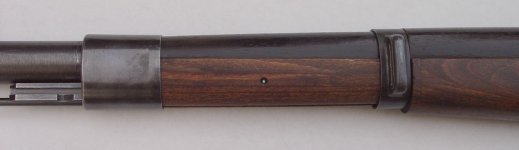
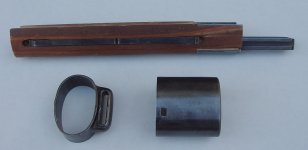
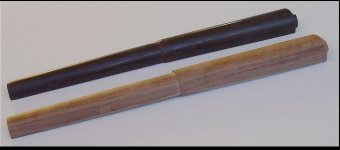
My first step was to get an original hand guard as a starting point for re-creating the missing fore end. I also needed the barrel bands in order to machine the correct shape of the fore end. The hand guard was provided by Terrill Biedenharn who not only owns an impressive collection of G41 rifles but also scours gun shows for spares to offer to other G41 owners. Although my rifle is an ac43, I settled for a duv hand guard to get the ball rolling. With the hand guard installed, I learned the stock had been shortened slightly past the step for the barrel band; not good as I now needed to add another piece to the stock. I ordered the missing metal parts from France. They are decent reproductions but not of breath taking quality and require different levels of detail work and fitting.

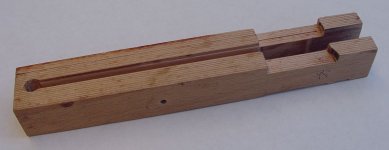
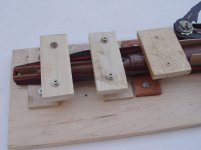
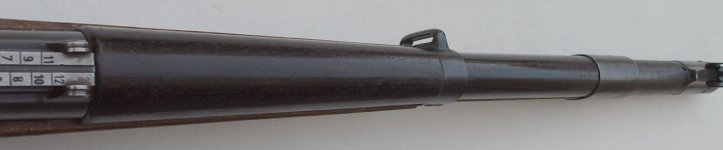
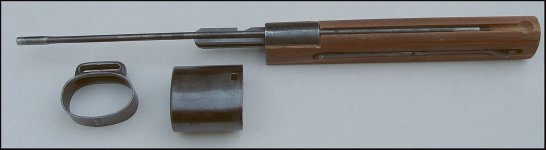
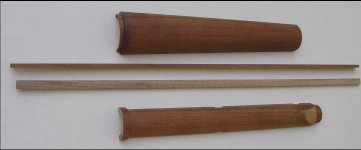
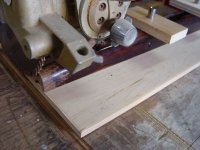
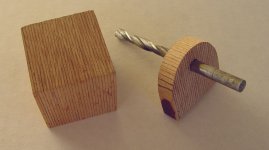
In order to get my power tools and fixtures set up for making a new fore end, I experimented with a 2x2 piece of pine (the final piece will be machined from laminated beech wood). It turned out pretty good given that other than some internet photos I had nothing to go by when I needed to route out the grooves for the band spring and the cleaning rod. Getting the cutout for the bayonet lug right was even more of a challenge. Now that I have a perfectly fitting pine fore end it provides me with all the relevantant dimensions needed for machining a laminate wood fore end.

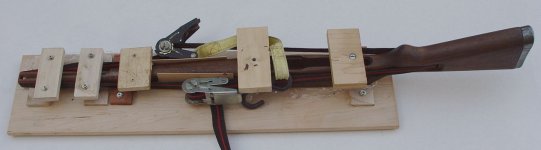
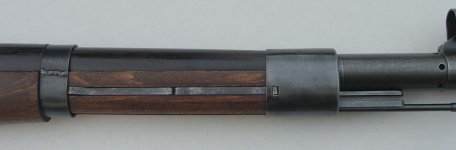
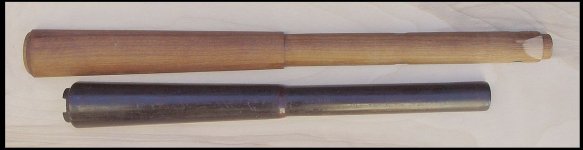
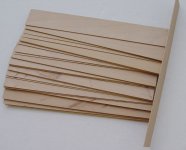
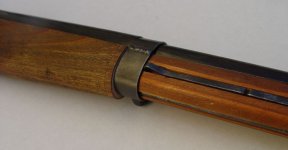
With a mock fore end on hand, I turned my attention to fabricating a less brittle hand guard then the original one I bought from Terrill. I had noticed similarities between my Springfield 03A3 hand guard and its G41 resin counterpart. I picked up a cheap 03A3 hand guard from Sergio of Northridge Inc, cut it up, added walnut strips to increase height and shaped it on a Craftsman router. I ordered brownish-red Resorcinol resin (nowadays called Cascophen) from Aircraft Spruce for gluing all pieces together. A lot of sanding using a Dremel sanding drum was necessary to allow the actuator rod to move freely underneath the hand guard. A dark ebony stain will hopefully make it look close to an original Walther part. In hindsight I should have probably just ordered a wooden hand guard from Lestek Fox... Well, the labor of love, or so they say.

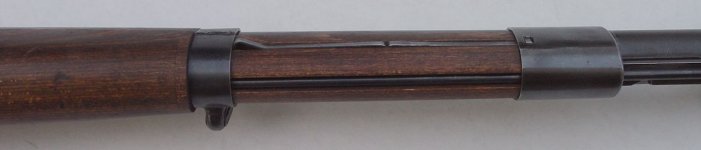
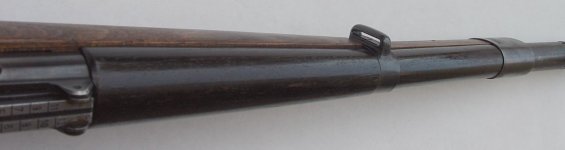
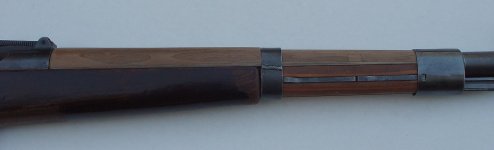
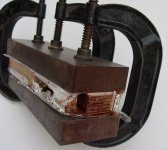
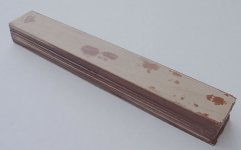
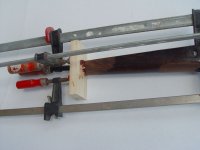
I have attached a couple pictures of where I am right now. A laminate beech wood block has been created and is ready to be shaped into a new fore end. The only thing still bothering me is the rounded off tip of the mutilated stock where the fore end butts up against. I may have to chop the rounded portion off -about 1/8" to 3/16"- and add a laminate shim to re-create the step in the stock for the lower barrel band.
 

Attachments

  • G41-1.jpg
    G41-1.jpg
    62.2 KB · Views: 223
  • G41-2.jpg
    G41-2.jpg
    82.3 KB · Views: 191
  • G41-3.jpg
    G41-3.jpg
    117.2 KB · Views: 153
  • G41-4.jpg
    G41-4.jpg
    185.1 KB · Views: 154
  • G41-5.jpg
    G41-5.jpg
    53.2 KB · Views: 136
  • comparison1.jpg
    comparison1.jpg
    52.9 KB · Views: 140
  • comparison3.jpg
    comparison3.jpg
    112.5 KB · Views: 132
  • handguard0.jpg
    handguard0.jpg
    164.4 KB · Views: 118
  • handguard1.jpg
    handguard1.jpg
    69.6 KB · Views: 117
  • handguard2.jpg
    handguard2.jpg
    69.3 KB · Views: 120
Thank you all for your encouragement. Here's a little insight into how I made the laminate for the new fore end: I used 24 strips of beech wood, sliced off of a solid piece on my table saw. That was the scary part as my fingers ended up very close to the saw blade. Each strip is around 0.053" thin after smooth sanding in a fixture. The clamping fixture consists of two solid steel pressure plates, 3 C-clamps and 4 identical spacers to keep the plates parallel. In a baking oven set to 180 degrees the Resorcinol resin cures in less than 30 minutes. After removing the laminate from the fixture I trimmed the block on my table saw to have square surface necessary for the subsequent cutting and routing operations.
 

Attachments

  • strips.jpg
    strips.jpg
    258.4 KB · Views: 94
  • laminate1.jpg
    laminate1.jpg
    249.5 KB · Views: 104
  • laminate2.jpg
    laminate2.jpg
    244.9 KB · Views: 101
  • laminate3.jpg
    laminate3.jpg
    163.2 KB · Views: 97
Great work!! I have completed two similar wood "rescue" projects myself on a G43 and 98k. Glad to see a fellow Kalifornian with skills.
 
I'll bet this one will be a really nice rifle to shoot. You must post pics and such of the range outting once done.
 
Happy New Year!

Happy New Year to all K98Kforum members. Project 41 has been steadily humming along, the rounded tip of the mutilated stock has been sliced off and replaced with a 3/16" laminated shim. The rear band now has a square step to rest against. Before gluing, I had to dip the tip of the stock repeatedly in acetone to get the oil out of the wood. After dipping, I boiled acetone and oil out of the wood with a hair dryer. I did that at least 20 times until the wood was dry enough to bond with the glue. That stock contained more oil than the engine block of my 55 Chevy. The replacement piece blended in pretty good, I used Birchwood-Casey walnut stain as a base dye, then rubbed charcoal into the wood grain to give it the "dirty" look. After fitting and sanding the shim, the stock ended up too smooth around the tip. I made it look "worn" again by steaming the smooth areas with hot steam from the tea kettle. The steam causes the wood to slightly swell and makes the wood fibers stand up, giving it the desired rough look.

The walnut hand guard has been stained with Minwax ebony stain. I was looking for the ebony version of Birchwood-Casey's water based walnut stain but it doesn't seem to exist. So I resorted to using Minwax, not knowing what I got myself into. Minwax is oil based and doesn't seem to penetrate wood as good as water based stains; it's more like a lacquer. I applied 3 coats to achieve the desired dark tint but I didn't like the looks of it at all. That is, until it had dried to a satin sheen and looked almost like the original Walther hand guard. The visible walnut grain structure and the splotched coat give it the been there, done that appearance which fits the rest of the rifle perfectly.

My next step is to fabricate the missing fore end from a laminate wood block.
 

Attachments

  • shim1.jpg
    shim1.jpg
    163.3 KB · Views: 92
  • shim2.jpg
    shim2.jpg
    86.3 KB · Views: 95
  • shim3.jpg
    shim3.jpg
    157.9 KB · Views: 92
  • shim4.jpg
    shim4.jpg
    48.2 KB · Views: 107
  • shim5.jpg
    shim5.jpg
    54.2 KB · Views: 111
I remember this rifle very well. I almost bid on it. But it went to the perfect home and your work is top notch! I enjoy seeing threads like these! :thumbsup:
 
Coming along great! It will be nice to have g41 that you can shoot without the total fear of an accident.
 
Thank you for your kind words, Tiger 2 Tank & CanadianAR. You're right, that's the beauty of not 100% perfect rifles, you can actually go out and have FUN with them. Beats a safe queen hands down. As most of you already know, I take everything out to the range, 100% matching or just a mixmaster, no difference (but I am using replacement bolts etc. instead of the fragile original matching parts, especially in WW2 semi's). Wouldn't take a Gustloff G43 to the range, though; that's pushing your luck.

I didn't get a lot done today, pretty much took it easy. 1st day of the year, whatcha gonna do? I played around with a 6x Ebra scope, dreaming up a K98 sniper. I have a polished and reblued byf 44 bolt M/M action with a sporterized barrel and a nicely worn bcd 43 bolt M/M action with a sewage pipe barrel and a correct replacement barrel in good to very good shape. I'm debating what would be the closest period correct setup, SSR type 3, LSR, turret or claw mount? The scope has double claws right now.

THunter, I also watched this rifle for a while before I finally sprung into action. The stock concerned me most. I actually copied the pictures into my drawing software, then overlaid a picture of a complete rifle form RI auctions to get a feel for the damage done to the stock. I'm pretty good at convincing myself, hence my swift move. If my memory serves me right, you are in Imperial county or OC or somewhere around that area, correct?
 
Im over in San Bernardino County; Inland Empire area. Gunsligers is about a ~40min drive from where Im located. I try to avoid buying anything in this sate (DROS, tax, 10 day period and now as of today we need COEs.. :facepalm:).

Youre doing a excellent job on the restoration. Better than any job I could do (I lack the tools and woodworking skills) so Im glad you got it!

Is the stock varnished? Looks like underneath it theres some nice laminate.
 
Can't wait to see if this repair will hold up to the pounding of the 8mm :googlie !! I guess if it were me, I'd probably run a mag through it kind of slow, then empty a mag pretty quick just to see. I think it will be cool!
 
Can't wait to see if this repair will hold up to the pounding of the 8mm :googlie !! I guess if it were me, I'd probably run a mag through it kind of slow, then empty a mag pretty quick just to see. I think it will be cool!

I too think it will be cool. Never had the chance to fire a G41, this one is going to be a hoot. I don't think the repair joint will fail. I'm only half way there, the fore end and the repair shim still need to be dowel pinned to the stock and glued in place with Cascophen. I have done a similar repair already in the past, attaching a home made fore end to a mutilated K98 stock. I've fired hundreds of 185gr rounds through that rifle and it has held up fine so far, see my repair here:

http://www.k98kforum.com/showthread.php?3289-Duffle-cut-repair-(pics)&p=38537&viewfull=1#post38537

Cascophen is a cool glue. It has been around for about 80 years or so, formerly known as Resorcinol formaldehyde. Until the invention of epoxy resin Resorcinol was one of the most common wooden airplane and marine glues and it's still available today. It has excellent resistance to extreme temperatures, moisture and fungus. It also bonds oily exotic woods such as teak, rosewood and even oak (or an oily G41 stock as a matter of fact) where other adhesives fail. It's chemically resistant to acids, solvents and oils. And it produces the beautiful reddish glue lines on German WW2 rifle stocks...
 
Im over in San Bernardino County; Inland Empire area. Gunsligers is about a ~40min drive from where Im located. I try to avoid buying anything in this sate (DROS, tax, 10 day period and now as of today we need COEs.. :facepalm:).

Youre doing a excellent job on the restoration. Better than any job I could do (I lack the tools and woodworking skills) so Im glad you got it!

Is the stock varnished? Looks like underneath it theres some nice laminate.

Yes, there's a thick nasty layer of varnish on the stock. I wiped it off on one side to expose crisp eagle/359 Wa stamps.
I live on the opposite end of the 91 Fwy. In 2012/2013 I've been K98 hunting (no pun intended) on your stomping grounds. Picked up a virtually unmolested bolt M/M dot44 and a mixmaster byf44 barreled action in Riverside for little $$$. Gotta love Craigslist. I passed up a Czech post-war K98 in the Fontana or Norco area because the guy wanted too much money.
And yes, Kalifornia sucks big time for being an obnoxious nanny state that taxes everybody up the whazoo and still ends up broke as sh!t.
 
Has been a while since my last post... Lots of progress in the meantime, also some setbacks, though. I rough cut the laminate block and routed out the barrel channel, the recess for the bayonet lug, notched out the cleaning rod channel and the groove for the barrel band springs. That's when disaster struck. The 5 millimeter bit I used for the spring groove was custom made from a 1/4" router bit. I ground down the diameter of the bit but as a negative side effect I also reduced the clearance angle to evacuate the chips. Now the bit became sensitive to clogging, resulting in runout while routing the spring groove. The top four layers needed to be replaced. Luckily the wood piece had not been shaped yet and was still a square block, therefore I could shave the damaged layers off with a table saw, then glue on four new layers. This rework set me back by one day but the next go around resulted in a perfect groove.

I drilled the holes for the bayonet lug pin and the barrel band springs, rough cut the contour of the fore end on the table saw, then manually shaped the rest using 60 grid sandpaper on a flat plate. That was about 3 hours worth of sanding, checking, and sanding again. Finally, when the shape was right I matched the new fore end up with the stock, determined the best location for dowel holes, drilled the stock and match drilled the fore end. I final checked fit and function before putting stock and fore end for their wedding into a special alignment fixture. With the varnished removed from the stock it is starting to look really good.
 

Attachments

  • laminate4.JPG
    laminate4.JPG
    64.9 KB · Views: 61
  • laminate5.JPG
    laminate5.JPG
    64.1 KB · Views: 76
  • laminate6.JPG
    laminate6.JPG
    44.2 KB · Views: 64
  • laminate7.JPG
    laminate7.JPG
    57 KB · Views: 82
  • finalcheck1.JPG
    finalcheck1.JPG
    82.1 KB · Views: 88
  • finalcheck2.JPG
    finalcheck2.JPG
    81.4 KB · Views: 88
Finally back to its original beauty

Finally, the Mighty Walther has been returned to presentable condition. It has been a long struggle but the results made it worthwhile.

After fitting all piece parts of the front end assembly, I prepared a jig for lining up stock and fore end, bolted down some bracketry and prepared tie downs for clamping. A plastic straw was shoved through the cleaning rod channel all way down to the nut to keep Cascophen glue from clogging it. At the end of the 12 hour cure I removed the stock from the jig, made sure stock and fore end were still lined up perfectly before reinstalling the action.

Seeing the rifle in its almost former glory is a great reward. All external wood surfaces were subjected to a good Howard's Feed-N-Wax treatment which made the colors pop while sealing the wood against moisture. This rifle is not supposed to be a safe queen, therefore the Durofol hand guard has been replaced with my wooden replica and the original matching bolt assembly with a shooter grade mismatched assembly, only keeping the original locking lugs because of existing wear and break-in. 71 years after leaving the factory in Zella-Mehlis, after having been pried out of the hand of the hunter by the hunted, after decades of use and abuse the once beaten warhorse is ready to call the shots again. My G41 has come a long way but its journey has just begun.
 

Attachments

  • jig2.JPG
    jig2.JPG
    48 KB · Views: 189
  • jig3.jpg
    jig3.jpg
    278.6 KB · Views: 188
  • final1.jpg
    final1.jpg
    79.6 KB · Views: 106
  • final2.jpg
    final2.jpg
    70.8 KB · Views: 84
  • final4.jpg
    final4.jpg
    46.5 KB · Views: 85
  • final5.jpg
    final5.jpg
    50.9 KB · Views: 87
  • final6.jpg
    final6.jpg
    37.6 KB · Views: 71
  • final7.jpg
    final7.jpg
    37.3 KB · Views: 70
  • final9.jpg
    final9.jpg
    37.7 KB · Views: 73
  • final10.jpg
    final10.jpg
    32.9 KB · Views: 79
A great looking rifle and an outstanding effort to bring it back. You've saved a nice piece of history and well worth your many hours of work and problem solving. Nice write up too as you progressed with it.
 

Military Rifle Journal
Back
Top