Third Party Press

The SMG FG42 In Detail

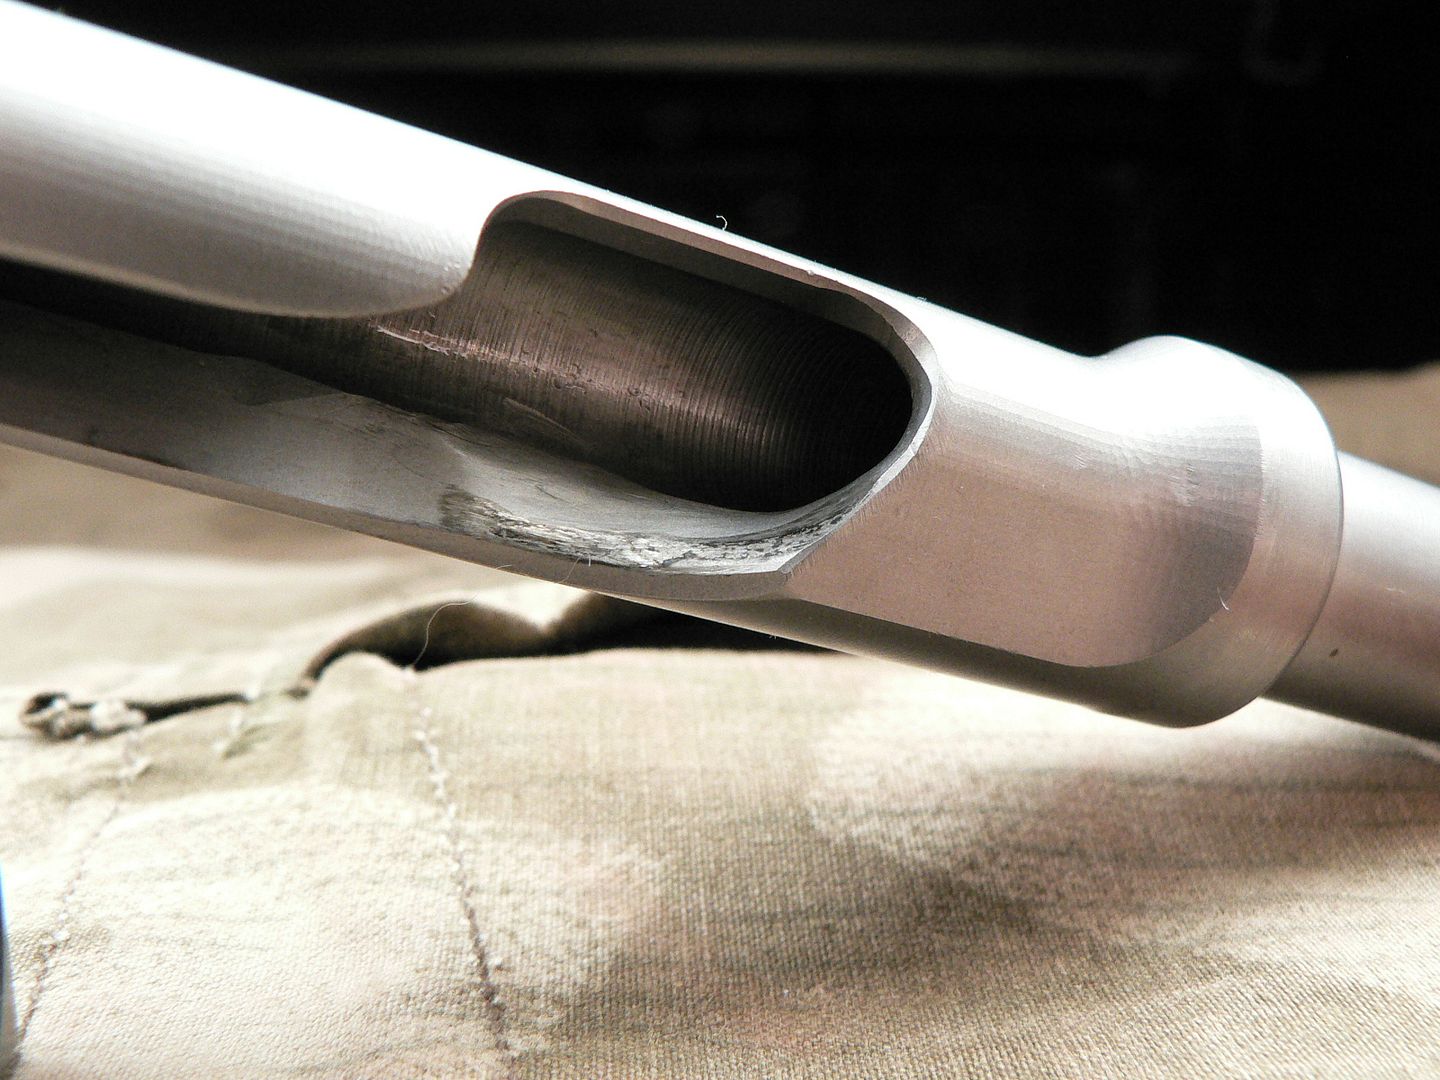
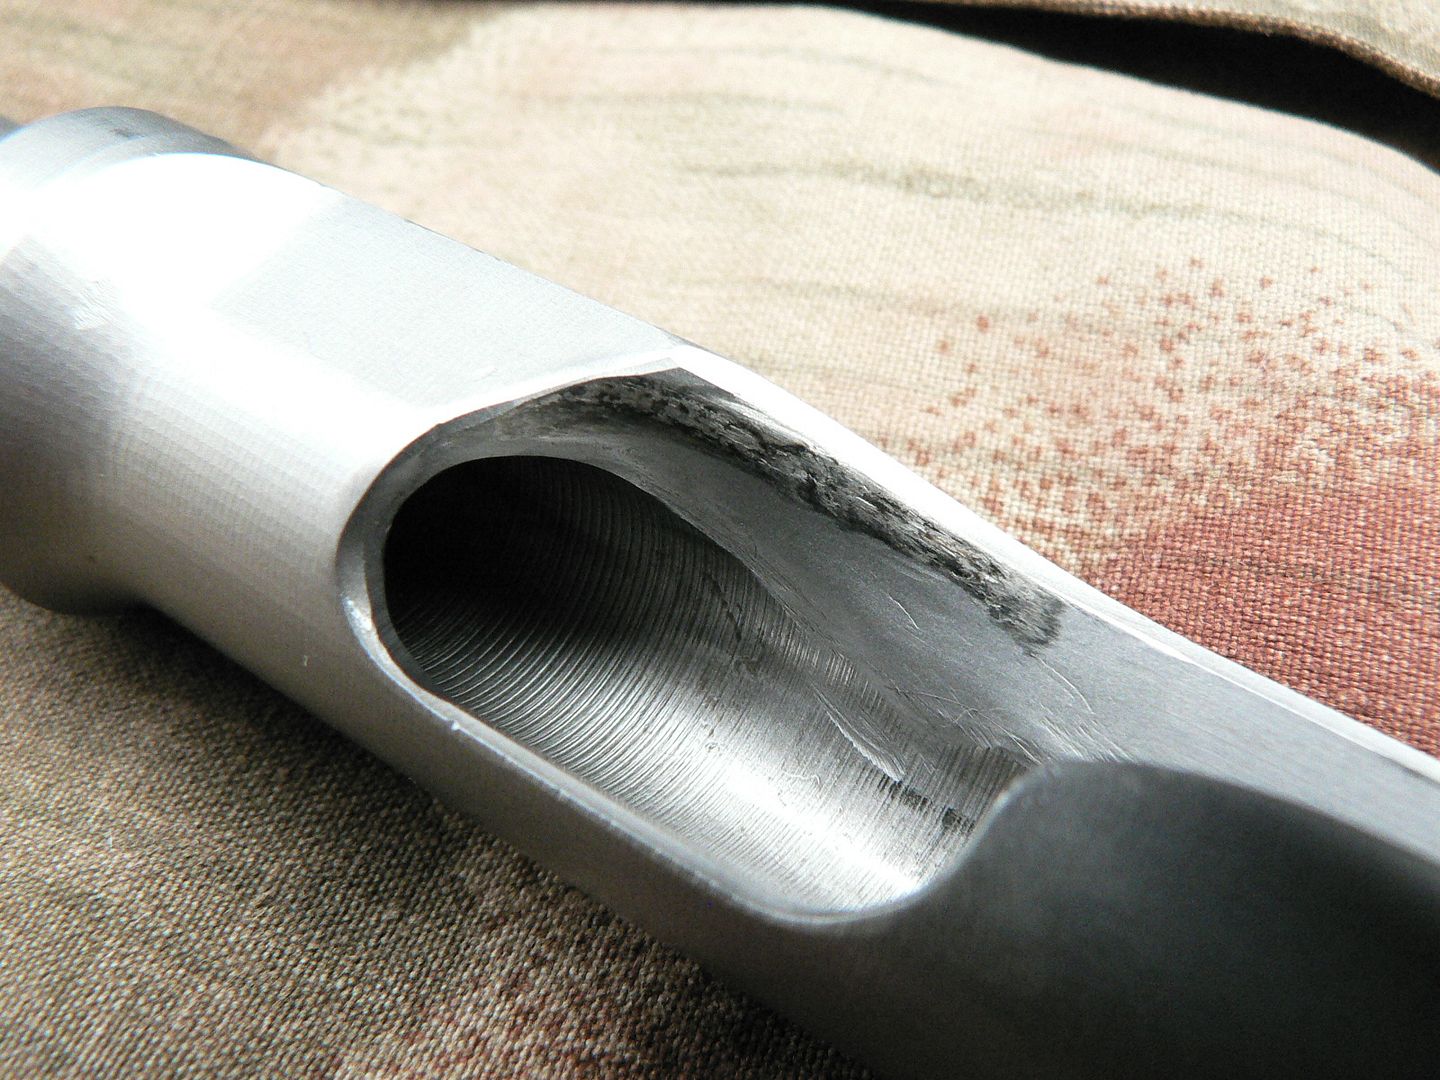
Here's a detail shot of the ejector slot:


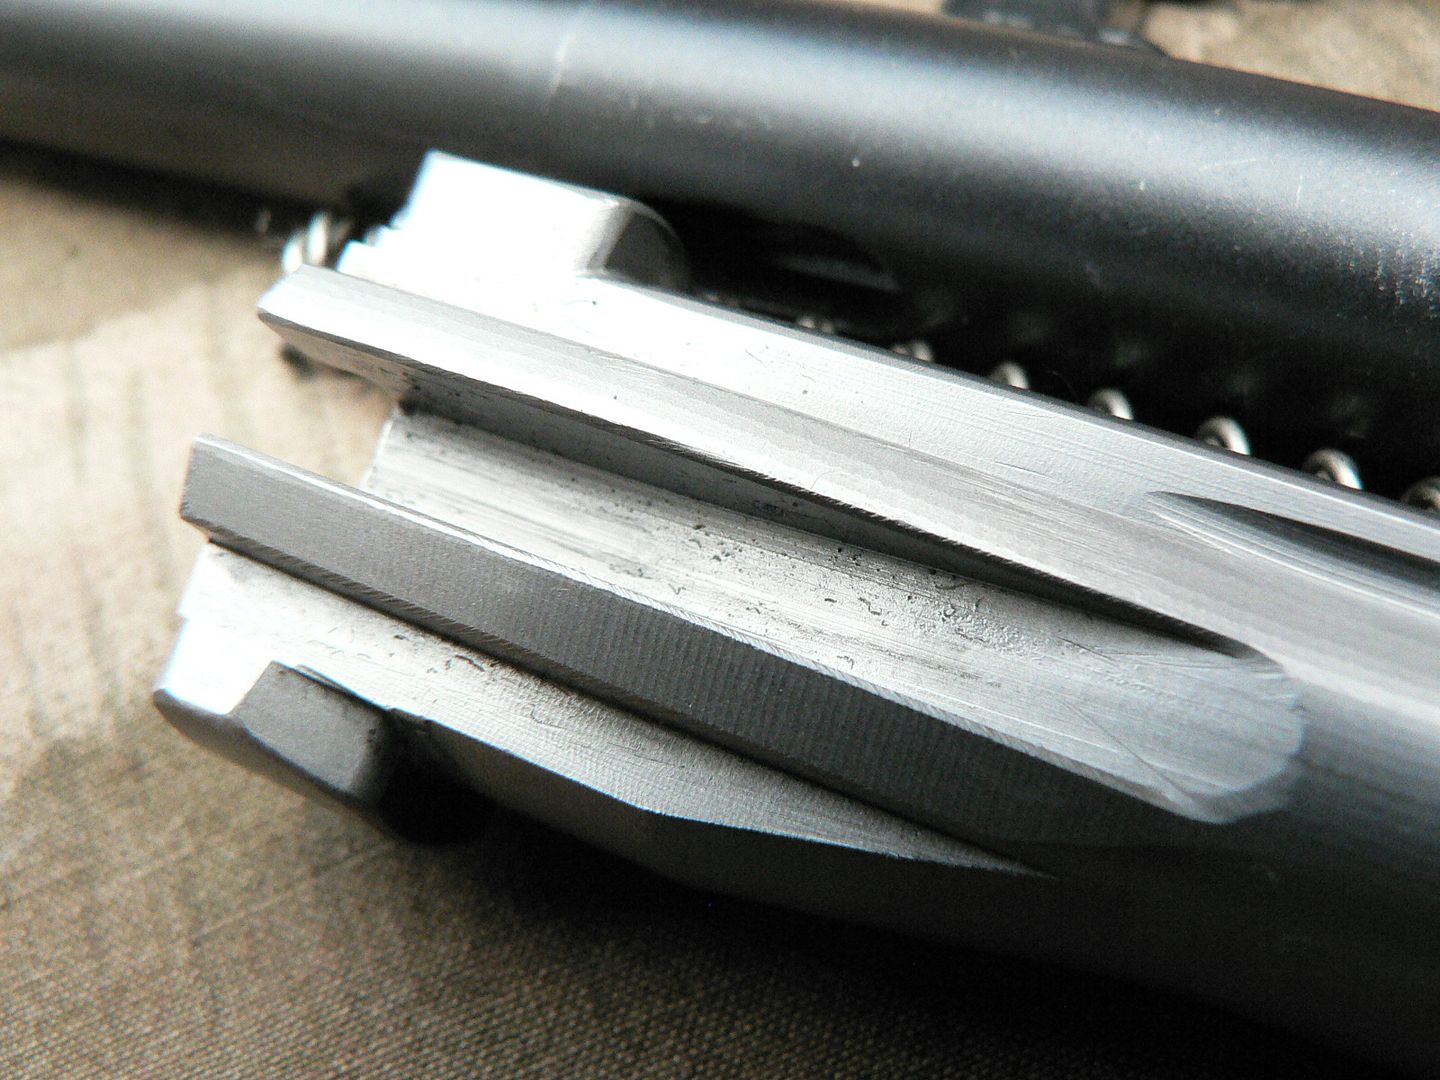
Here are a couple photos of the cam slot showing what is again NORMAL wear:


SMG says in the video included with each rifle that you may even start to see chips of metal missing in this area over time. Apparently, it is normal so don't wig out when this starts to happen. Just keep shooting. SMG has over 15,000 rounds through their test rifle so I'll just take their word for it. I know I'll probably never put 15K through mine unless one of you want's to donate some ammo. I don't know what the black marks are in the wear area. It doesn't rub off so I just ignore it.

Let's take the extractor apart. Here it is assembled:


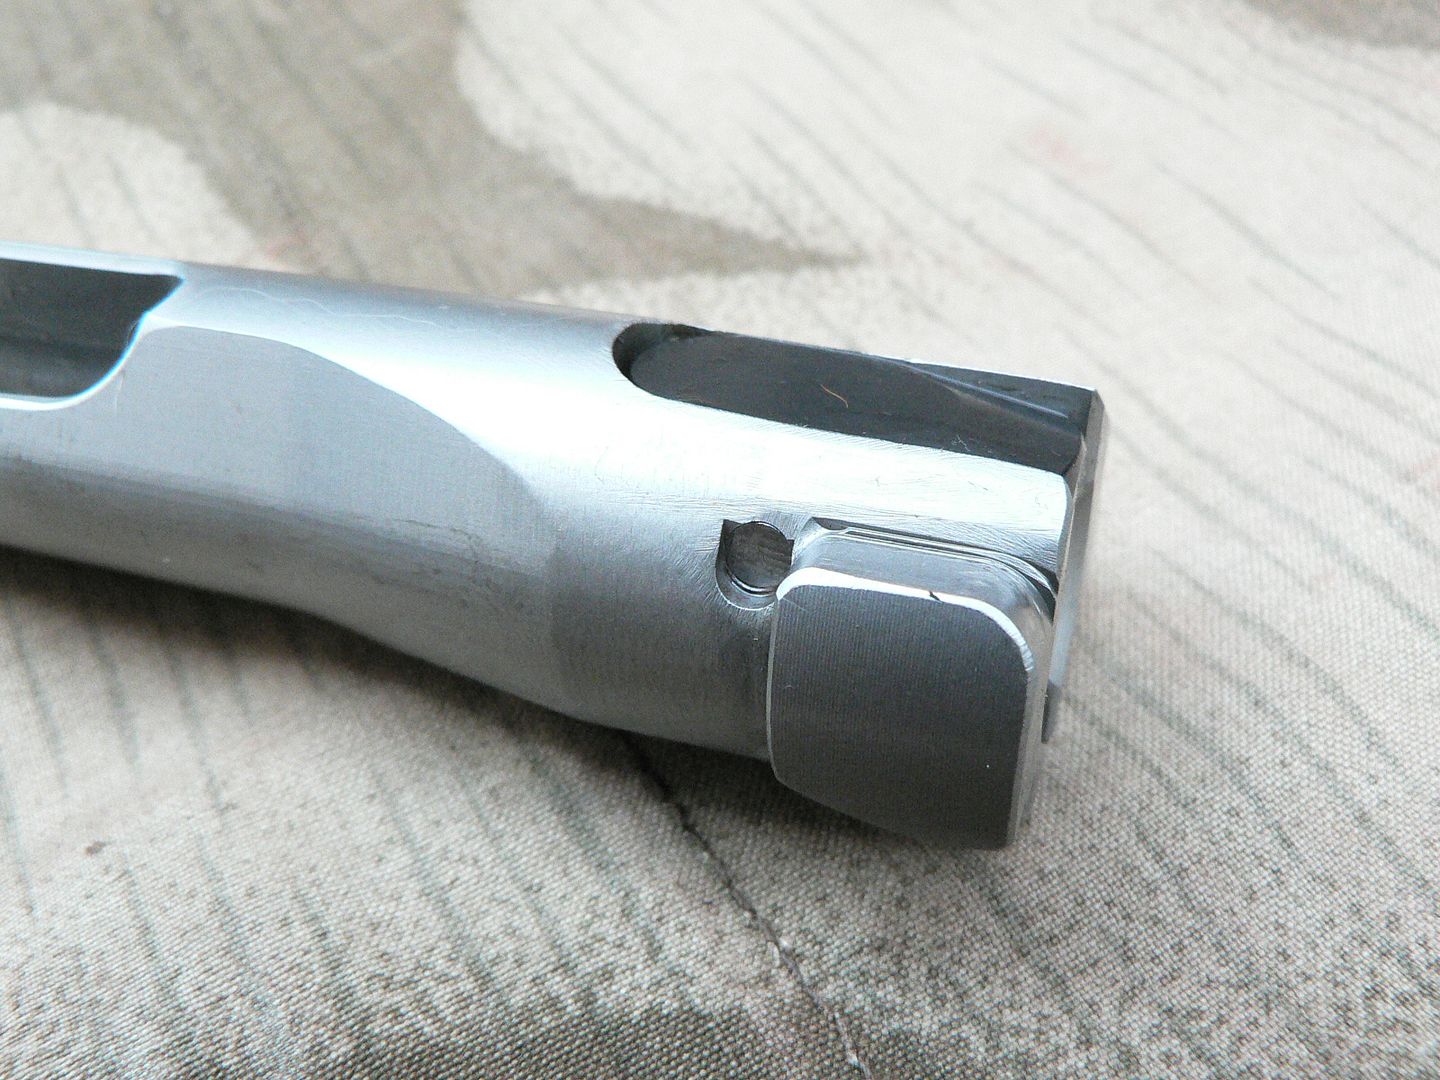
To disassemble, simply press down on the rear of the extractor and use a punch or bullet tip to push the retaining pin out. Here it is shown disassembled:


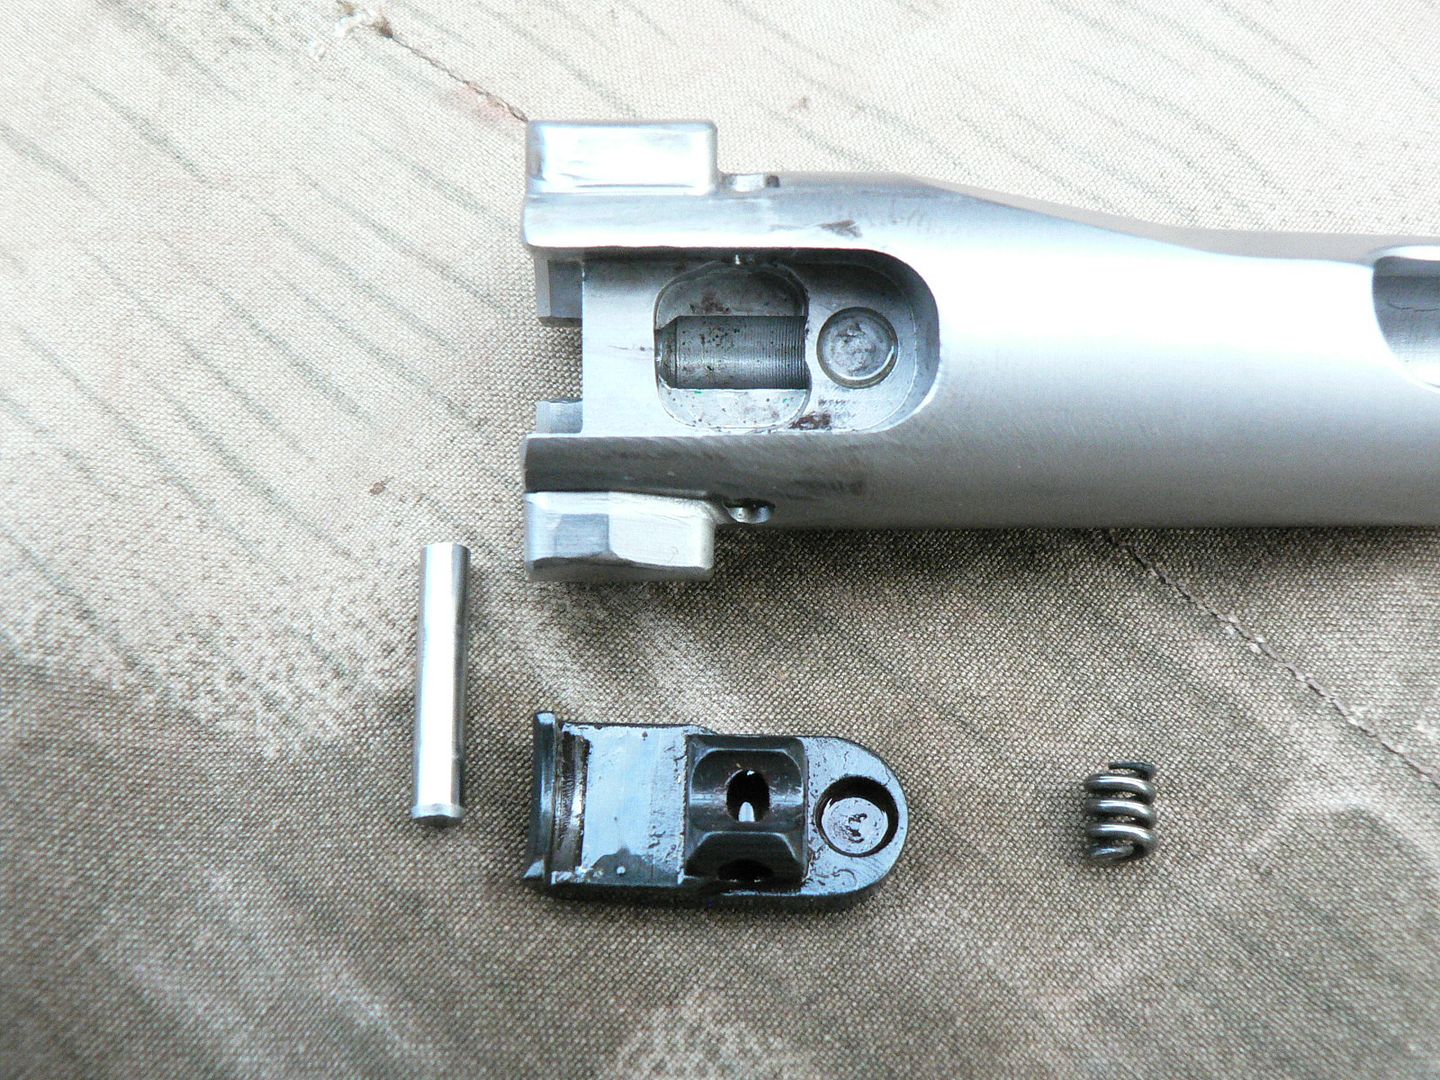
When reassembling the extractor, be careful that the spring engages the cutouts for it in both the bolt and extractor. It's small and can easily be tipped on its side during reassembly. This design is different than an original rifle but I don't know why. I do know that it works just fine. It also comes apart and goes back together very easily which is a big plus after messing with that cursed firing spring plunger earlier. Did mention that part needed to be redesigned?


That's it for the bolt. In the next post, we'll start with the bolt carrier and go from there. See you then!
 
In this post, we will finish up looking at the rifle itself. To do that, we need to talk about the bolt carrier.

The bolt carrier consists of three basic parts pinned together to make one unit which cannot be disassembled. At the rear is the bolt carrier proper. It holds the firing pin in place via the yolk machined out of it. This yoke also acts as a cam that causes the bolt to rotate as it moves back under gas pressure and forward under spring pressure, unlocking and locking the action in the process. In the middle is the operating rod. Its job is simply to connect the gas piston to the bolt carrier. The charging handle plugs into the operating rod too. Up front is the stainless steel gas piston. It's the part that takes the impact of the gas tapped from the barrel which drives the entire assembly to the rear.

We'll start with the rear of the unit:


The hole in the rear is where the recoil spring fits. The thing in that hole that looks like an insert is actually the rear of the operating rod. Inserted from the front, it passes all the way through the bolt carrier and is pinned in place. The pin is just barely visible above the step running up the side of the carrier. In this view of the right rear, the pin is more visible:


Also of note in the above picture is the wear mark on the right rear corner of the yoke where it contacts the cam slot in the bolt.


Here is a view of the front of the carrier showing marks where the left front of the yoke contacts the bolt during operation:


Judging by the circular mark above the step in the side of the carrier, there may be a second pin holding the operating rod place but I'm not sure about that. That mark may simply be a machine mark. I assume that the yoke must take a tremendous beating as it does its job because it was a common failure point in rifles tested during the war.


The only thing of interest on the operating rod is the cutout for the charging handle:


Hidden inside the operating rod is a non removable plunger. When the recoil spring is in place, it pushes the plunger forward and into engagement with a notch cut into the charging handle stem, locking it in place on the operating rod. Here, the plunger has been moved forward until it is visible in the cutout:


All the way at the front of the assembly is the gas piston:


It is inserted into the operating rod and pinned in place. The pin is visible in front of the charging handle cutout.


A detail shot of the gas piston:


That's it for the internals. Here's a nice neat picture of all the bits and pieces disassembled including the standard round that the rifle fires:


OOPS! How did that 7.62x54 round get in there??

Let's try that again with the proper Turkish 8mm round:


NO NO NO!!! DO NOT UNDER ANY CIRCUMSTANCES SHOOT TURKISH 8mm THROUGH THIS RIFLE. For that matter, don't shoot the Turkish stuff through ANY 8mm rifle except for a bolt action. If you do, you are risking not only your rifle but your life as well. DON'T DO IT!!!! Am I clear on that?

Alright, here is a family picture showing all of the internals. I'm not going to list each part because you should already know what they are if you've stayed awake and read everything:


These next photographs are just miscellaneous shots of the empty receiver and a few notes about them.


Inside of the magazine well showing how clean the weld line is where it meets the receiver. The only evidence of the weld is a slight hump:


The area at the front of the magazine well which engages the front mounting lug on the magazine:


A view through the ejection port showing the single spring used for both the magazine catch and the ejector:


A view up into the breach showing part of the trunnion and one of the cuts for a locking lug on the bolt:


And finally, the ejection port:


A note about this opening. If you are like me, you'll stick your finger through any opening in the receiver while cleaning in an effort to get to any powder residue and funk that has accumulated through use. DON'T stick your finger in this hole. On my rifle at least, the inside edge of the ejection port was not polished so it's as sharp as a knife. I stuck my finger in there and it was cut on both sides immediately. That felt really nice with Hoppes #9 all over the place........


That's it for the rifle proper. We're in the home stretch. In the next post, we'll start looking at the accessories beginning with the magazine. Bye for now!
 
Today, we'll look at the 20 round magazine. This item is the #1 weak point of the rifle because it is not produced by SMG. It is actually a Czechoslovakian made ZB26/30 produced very long ago, as in pre-WWII. The magazines are extremely well made and durable but there are two problems. First, because they have not been produced in 70+ years, there are only so many around. Second, like all magazines of that era, there are inherent variations in the dimensions so that a given magazine may or may not fit your rifle. Back then, the factory tested magazines with each rifle until they found a given number that worked well with that particular rifle. These magazines were then numbered to and issued with it. SMG does the same thing and includes two magazines numbered to the rifle. So far, I have tested five magazines with my rifle. The two that were numbered to it worked just fine as did one of the unnumbered ones. However, the other two unnumbered did not work. One of them had a follower that stuck in the magazine body when loaded past just a few rounds (there are no dents in the body either so I'm not sure what the issue is yet) and the other would not properly lock into the magazine well so it would fall out after just a few rounds. These magazines are not cheap either so it quickly becomes an expensive gamble to buy them untested. But we are not taking this thing to war either so do you really NEED more than two magazines when they are so well made that you will never wear even one of them out? Alright, lets take a look at one.

Here's a 3/4 front view of the ZB26/30 magazine:


Given its age, there are some blemishes in the blued finish so it doesn't exactly match the new finish on the rifle. No biggie.....just make your rifle match through some hard use!

Here's the rear:


The bit left in the white at the right of the picture is the follower. Some are blued and some are not. When the magazine is empty, the bolt will catch on the follower and hold the action open, just like an original rifle. When you remove the magazine, the bolt will fly home if you do not have a firm grip on the charging handle. DO NOT let it fly home on an empty chamber as this is detrimental to both the chamber face and the sear. Instead, ease the bolt forward after magazine removal.

Here's a closeup of the original markings on the rear spine showing that it was made in 1937 and matched to a rifle with a serial number ending in 270:


The bottom showing the floor plate with the rear to the right:


To remove the floor plate for internal cleaning or inspection, use a bullet tip to depress the spring button and slide the floor plate to the rear.


So, why use this magazine if it's so old and potentially finicky? Here's whet SMG has to say on the subject:

" This was done in an attempt to use a high quality mag that was moderately priced, available, was the right caliber and looked right..."

It is a decent visual match to an original magazine as can be seen in this picture with an original on the right:


Yes, that is an original WWII German FG42 magazine and NOT a Shoei copy. Original magazines WILL NOT fit into the SMG rifle.
 
In this post, we'll be looking at the sling. SMG DID NOT make the sling and I have no idea who did but it was included with the rifle and is supposed to be a reproduction of an original sling. We'll put that to the test by comparing it to an original sling.

Here is a general comparison shot of the two with the reproduction on the right and an original on the left:


From this distance the repro looks pretty good. Compared to old wartime pictures in a book, it looks really good. On the repro, all hardware is painted black. On the original example shown here, the front carabiner is in the white, the adjustment buckle now has a brown patina but I think it was originally blued and the rear attaching clevis is painted black. I'm sure that there must have been variations on a theme though as is typical of German equipment of that era.


Lets move in a little closer and start the comparison in earnest with the front attachment carabiner:


The original is on the bottom in the above picture. The carabiner is made of steel and it's quite heavy. The spring is very stout too. The repro feels cheap and light like it's pot metal or aluminum and the spring is nowhere near as strong. In form, the repro looks absolutely nothing like the original. To be fair though, it seems to work just fine for it's intended purpose but I guarantee you that it would snap easily if you were to abuse it in the field. The original is built like a Panther tank. The diamond pattern on the leather is pretty good and the quality of the leather itself seems to be as good any wartime sling I have encountered.

Here's a bottom view of the adjustment buckles with the repro on top:


The stitching is as good as the original but the buckle is a joke. The weld is rough, the steel feels like tin and there is no leather wrapped around the bottom. In fact, the entire bottom of the buckle is so misshapen and the lock bar so useless that the buckle does nothing. If you use the sling to lift the rifle, it simply slips in the buckle until it's at maximum length. If you walk with the rifle shouldered, the sling again slips through the buckle until it's at maximum length and the rifle is dangling all over the place. Fail.


A side view of the buckles:


Again, notice how misshapen the bottom of the buckle is. The lock bar is not of a large enough diameter to firmly squeeze the leather between itself and the top of the buckle. The lack of a leather wrap to grab the lock bar just exacerbates the slippage problem. It's just plain worthless. I may try to beat the buckle into something resembling flat and square or I may just use it as a target.....I haven't decided just yet. I really have no use for a product that is cheaply made and doesn't do what it's supposed to do.


A top view of the rear attachment clevis with the repro on top:


This part kinda' sorta' looks like the original but it's still pretty bad. Notice how the original has the sling loop molded into it while the repro has a poorly shaped and thin oval barely welded to the clevis. Just as with the front carabiner, there is a noticeable weight difference between the two. The lug sticking out the side of the clevis is the push button used to open the assembly for installation on or removal from the stock. Again, the stitching and leather tooling is on the repro is excellent.


The pushbutton side of the clevis with the original on top:


To the left of the picture we can see on the original where the weld holding the pin to the arm was ground down somewhat crudely. We can also see the manufacture mark upside down. L&F was a major manufacturer of slings. On the repro, we can see the weld for the pin through the paint. While the spring on the repro seems to be as strong as on the original, the push button does not operate anywhere near as smooth.


This last shot is the other side of the clevis with the repro on top:


Notice on the repro that the pin is not flush with the surface of the arm. That's because neither the pin nor the hole in the arm is perfectly round so the pin will not fully seat. Big thumbs up on that. It works but it won't hold up to real use. On the original, the pin properly seats in the arm. We can also see grind marks to the weld holding the arm to the pushbutton.


By now, I'm sure you have guessed that I do not hold the repro sling in high regard. The leather, leather tooling and stitching are all first class but the whole thing is ruined by the cheap to the point of worthless hardware. I guess it's good that someone is at least trying to make one and it's fine for display I guess but it's junkola if you plan to actually use it. As for calling it a "reproduction", you might get away with that word if you've only seen an original in old photographs or at a distance but when sitting next to an original, I think the words "cheap knockoff" are a more fitting description. Being that there were various sling manufacturers during the war, maybe one of them actually made one that looked like the "reproduction" pictured here but since originals are not to be found in abundance, this example is the best I could come up with for comparison purposes. Whatever the case, I can't recommend this sling unless someone upgrades the hardware.


In the next post, we'll look at the scope and mounting rings. I am much more enthusiastic about those because they are as good as originals (probably even better in the case of the scope) and a worthwhile addition to the SMG FG42 if you ask me.
 
Today I took the FG42 out to the range in order to test the Meopta scope and Estes Adams mount. The first time I had it out, I had a wandering zero problem because the rings couldn't be tightened enough to hold the scope. I contacted Mr. Adams and he asked me to send him the setup for diagnosis. He found that the rings were not made quite right and personally reworked the mount so that it would be right. Today was the day I was waiting for. There was a medium soaking rain so that I could test how watertight the scope was as well as how tight the rings were. I also planned to use this opportunity to test the remaining three magazines. The scope functioned perfectly and the mount held zero even after being removed and re-installed on the rifle. Thank you so far Mt Adams!! I took 80 rounds of 1972-73 dated FNM surplus with me. I've shot a lot of this ammunition over many years in everything from G41's to G43's and from FN49's to Hakims and it has always functioned 100%. It was especially accurate in my scoped G43, shooting the center of the target out every time I used it. It's pretty much considered to be the BEST surplus 8mm ever available. Magazine number 1 for the day was a dud. As more rounds were inserted, the follower began to stick more and more. By round 18, there was no spring tension at all. I just dumped the rounds out and moved on to magazine number 2. After the first 10 rounds the scope was zeroed at 100 yards and I went to work. Somewhere in the second ten rounds I had a failure to feed:


It was easy to clear. Just pull the bolt back and the round fell out. Let if fly and back to work. 19 rounds and 1 dud so far.


Next magazine I had three intermittent failures to feed. They are pictured in sequence from left to right:


The last was round 18 for the magazine and it almost seated but not quite. I have no idea exactly what caused the dent or the gouge. It was VERY hard to extract. The rifle was also much harder to charge at this point. In fact, it seemed to be getting harder as it warmed up. The scope was still holding zero. I fired the last two rounds from the hip because of the hard charging issue. I wanted to see where they landed. The gas setting was on high just as it was when I received the rifle. They flew about ten feet or so between the 10 and 11 o'clock position just like every other round. At this point, I had fired 36 rounds and had four duds, all failures to feed. I then inserted a magazine that had worked perfectly the first time I had the rifle out to the range. Round one (41 for the day) fed fine but the bolt did not open after firing. It had recocked but had not begun to unlock. I tried the SMG method for clearing it which is to bang the butt on the wooden table. Zero movement. Next I tried placing the charging handle on the edge of the table and leaned into it. I'm 6'2" and about 240 pounds and I was putting everything I had into it. Nothing. I tried banging the charging handle on the edge of the table. Nope. I stood above the rifle with the charging handle resting on the edge of the table and laid on the buttstock. It wasn't opening. It was locked up tighter than a nun. I messed with that thing for over twenty minutes in a nice soaking rain before giving up and coming home. I was so frustrated, I forgot to bring my target with me. It's about a 25 minute drive home. I took everything out of the truck and left the rifle in the garage while I came upstairs to put stuff away. I then headed back down to the garage intent on using a hammer if necessary. Before resorting to that though, I tried charging the handle by hand again. Still nothing. One last try before I break out the sledge....I'll catch the charging handle on the workbench and lean into it just like I did at the range. The action FINALLY opened and the casing fell out. It looks perfectly normal. The only thing I can figure is that the action is binding as everything heats up. The first time to the range ended in a locked action and nice marks on the handguard. I thought it was a magazine issue that time. This time, after only forty one rounds (37 actually fired) my range trip ended with a locked action and more marks on the handguard. The marks aren't as bad this time but they are there nonetheless. I see nothing out of the ordinary on the internals that might be causing this. I can only speculate that it is a heat and expansion issue. I will be contacting Rick Smith tonight. The reason I generally only buy military rifles is to avoid this kind of stuff but I made an exception for this rifle. For this amount of money, I expect perfection. Looking good isn't good enough and I'm starting to lose faith. I worked at the Post Office for over 13 years before quitting in disgust and now thought of trusting God knows who to send this thing halfway across the country makes me sick to my stomach.......
 
121 rounds so far. I'm hoping that it's just tight and needs to wear in. I'll see what Rick has to say. I'm used to buying rifles, taking them out to shoot them and they just work. I'm not used to fiddling around with problems. Here's my math:

In 1988, I paid $313.95 for a new Chinese AK. I've had it for 26 years and put over 10,000 rounds through it with zero jams.

In 2014, I paid over 20x that amount for a new FG42. I've had it just a little over 2 months and put 1.2% of the rounds through it with 5 jams so far.

Hopefully you can see the source of my frustration. I know that Rick will try to fix this and I DO appreciate that but it shouldn't need fixed. It should just WORK.
 
Last edited:
Yes, send it back - I want to see whats up myself as this is not the way they work - or don't. The "stubs" and dents I see in the case (from the two ears on the bolt gouging it) are from a round that wasn't brought up into position fast enough to get "ahead of the bolt" for stripping. When that happens, normally due to a weak magazine spring, or ammo that is not cycling the bolt back far enough to give the mag time to position the next round before running forward. Regardless of the reason if that round then gets ran into the chamber it does not fit cause it is severely dinged you will play hell getting it out.

Did the bolt always lock back on the last round? If not it needs more gas for that ammo. I wonder if you ever tried turning up the gas to the higher setting or since it seemed to be working ok never considered it a problem. Having said that if it has adequate gas and you turn it up then you will again get these EXACT types of stoppages/failures/jams as the bolt will rebound off that buffer with such speed the mag spring doesn't have a chance of getting the next round ahead of it. Maybe the ammo you are using is a little hotter than what we test with so have you tried turning the gas down (if it is on the higher setting). Have you ever tried shooting the rifle with new ammo like S&B or Privi? Thats what we test with and really the only thing we can guarantee function with.

I know these things as they have been learned the hard way with thousands of rounds of all kinds of ammo with all kinds of failures to the point now I can tell you with pretty good certainty what caused it. Simply said the FG42 is not an AK and I would not be surprised to see it fail the mud or sand test etc. But with basic function the rifle works - but yes does need a few basic things. Send it back, we will video unpacking it, looking it over, and testing it with our new ammo and post the vid.

And the "seems harder to work the action" coupled with the sudden onset of what appear to be undergassed issues leads me to believe the ammo you are using has lead to an excess carbon buildup in the gas block where the piston rides and is causing excess friction there - wrong ammo if so - or clean more often. Romanian steel case we found would do the same thing anywhere from 300-800 rounds and then we would have to take the cap off the gas block and clean it and then back to normal. And gas systems do not like all powders equally or there would never have been issues going to ball propellant in the early M16's as it worked in other gas operated rifles just fine........ Or.....

Minimal lubrication..... Like most rifles the FG42 will run pretty dry but doesn't really like to. A drop or two of the really great lube in that little plastic bottle that comes with every new rifle on the bolt lugs, and even more importantly in the bolt slot/track where it curves at the end..... Dry parts that are seemingly trying to resist all movement suddenly work with 20% of the original effort with a little lube. Just a thought......

And I realize a person should never have to do anything but buy ammo and pull the trigger - thats my idea of fun as well. And beleive me when I say that is what we always shoot for. But trust me also when I say the problems you are having I have seen before and with the exception of "it should run 100% no matter what I feed it" it just hasn't turned out to be the rifle....... We want you to be happy - they are cool/fun rifles......

Last edit... A mag that works great until it gets to the last 1-5 rounds is a weak mag spring issue. Unless it used to work great but now the gun is bolt over basing and then I am looking at a gas issue. How perfect does the gas need to be - just close as the rifle will eat lots of different ammo on the one setting. If it worked before now it doesn't - clean it. Then I would change ammo - or clean it more - I go for different ammo.


Rick
 
Last edited:
Wilhelm, the mangled tips of your bullets make me think they hit the feed ramp on the way into battery. From my PTR44 I have learned not to use any ammo with smooth bullets. Bullets without a cannelure often don't work reliably in semi-autos, unless they are pressed into a steel case or sealed with lacquer. In my PTR I compared handloads using the old Hornady 8mm 125 gr bullets without the cannelure against the newer 125 gr with cannelure. It's like day an night. The ones without cannelure constantly created FTF as the bullet was pushed back into the case when it hit the feed ramp, despite the bullet being crimped pretty good using a 3/4 turn setting with the LEE factory crimp tool. The same crimp setting but using a bullet with cannelure never created any feed problems. I use 150 gr Hornady bullets with cannelure for my G43 and never had problems there either. I feed the same rounds to my FG42 and it just eats them happily.
 
Rick, thank you very very much for responding. When I got the rifle, the gas was at the highest setting so I left it there. I will turn it down and try again using only the magazines you supplied with the rifle. Bolt always locks back. I always clean my rifles meticulously after each range trip, including the gas system if there is one. Lube, what's that??? But seriously, I have only sprayed some CLP on the parts when reassembling. I will try better lube. Rick, what's your opinion on using some of that wonderful Swiss Automatenfett grease (developed for the SIG 510 series and still used even today on their rifles) on the lugs and bolt cam track? Remember that I didn't buy this directly from you so the lube bottle you speak of was missing from my rifle. I guess the shop lost it. I will use the Swiss grease if you say it's ok, turn the gas down, use only your magazines and try again. I really do not want to send it back unless there is no other way. Again, thank you for taking your time to respond.
 
I just went to you tube and watched vaeious videos from different folks of your rifle in operation. My casings are flying much further than in the videos. I will certainly turn the gas down.
 
Hi Wilhelm,

Yes, I would put a small dab of the grease - or couple of drops of lube - on the bolt lugs. Also on the bolt carrier post/bolt cam track wear points most critically where the track curves right at the end of travel. Best/easiest way is - with the rifle unloaded of course - pull the charging handle back to let the sear engage the carrier - this puts the carrier post right at the rear of travel where things like a little lube. Turn the rifle on it's side - magwell opening up - and drip/swab the lube right on the back of the carrier post over onto the curve in the track in the bolt. If the weapon was hard to charge because it was dry this will be a fix that absolutely amazes with the result in reduction of effort!

If they failed to get the lube to you I can send you another. It is very good stuff but not magic so any good lube is ok. Also did you receive the ammo warning/warranty card that comes with every rifle?

Your rifle may have been one that was a little on the tight side when assembled/test fired and was set on the high setting when it went out. This is the case with about 10% of the rifles and normally within less than 200 rnds they have loosened up and need to be on the low setting or will zing brass 15 feet, kick with 15% more authority, and be in a competition with the mag spring to see who is fastest.

Normal ejection for the 8mm is 3-9 feet and normally forward more than laterally. Less than 3, feed issues and not locking back - too little gas. More than 9, kicking harder than it should, and having feed issues - too much gas. Honestly we have taken mags that had "weak springs" and failed test fire - they get one try - and about 30% would be fine with the gas setting correct.

Let me know how it goes as we build them to shoot and not be safe queens or PITAS. : )

I have stood back until now not wanting to interfere in any way with your awesome review as you have done an outstanding job - very few minor tech things only. Awesome job!


Rick
I just went to you tube and watched vaeious videos from different folks of your rifle in operation. My casings are flying much further than in the videos. I will certainly turn the gas down.
 
Thank you Rick! Here's what I'm posting in my thread everywhere it's posted:


I was in contact with Rick Smith. He told me to send it back and he would video the unboxing, inspection and testing and post the video. You can't ask for better service than that! However, I'm not quite ready to give up and return it for service without trying a few of his suggestions first; adjusting the gas setting to the lower setting being at the top of the list. I will also be using the magazines it was tested with and paying particular attention to lubing the locking lugs on the bolt and the cam track in the bolt. His correspondence stated:

" Your rifle may have been one that was a little on the tight side when assembled/test fired and was set on the high setting when it went out. This is the case with about 10% of the rifles and normally within less than 200 rnds they have loosened up and need to be on the low setting or will zing brass 15 feet, kick with 15% more authority, and be in a competition with the mag spring to see who is fastest."

Mine is still on the high setting and brass IS flying pretty far. I also noticed brass kisses on the receiver in front of the ejection port that weren't there first time out. So, too much gas just may be the main culprit here with the failure to feed problems. What he means by the last part of his statement is that the bolt is flying back with so much force and rebounding off the buffer so hard that it is getting back to the magazine before its spring has enough time to have the next cartridge ready for pickup. That still doesn't explain my lockup yesterday but I've only used CLP as my lubricant and I've kept my locking lugs bone dry, something I learned by shooting HK's for many many years where to DO NOT lube the trunnion. So, I will try again before returning it. That will be a couple weeks though. I will post the results.


I didn't put anything in there about the possibility of carbon build up because I always keep the gas system meticulously clean. There is only one exception to that. On my AK's, I almost never clean the gas tubes unless I'm shooting corrosive ammo. I do however always clean the gas piston very well.
 
I agree, I am sure the problems will be resolved by simply adjusting the gas setting and using some good lube where it is needed. Then shoot it a lot! : )

Rick

Thank you Rick! Here's what I'm posting in my thread everywhere it's posted:


I was in contact with Rick Smith. He told me to send it back and he would video the unboxing, inspection and testing and post the video. You can't ask for better service than that! However, I'm not quite ready to give up and return it for service without trying a few of his suggestions first; adjusting the gas setting to the lower setting being at the top of the list. I will also be using the magazines it was tested with and paying particular attention to lubing the locking lugs on the bolt and the cam track in the bolt. His correspondence stated:

" Your rifle may have been one that was a little on the tight side when assembled/test fired and was set on the high setting when it went out. This is the case with about 10% of the rifles and normally within less than 200 rnds they have loosened up and need to be on the low setting or will zing brass 15 feet, kick with 15% more authority, and be in a competition with the mag spring to see who is fastest."

Mine is still on the high setting and brass IS flying pretty far. I also noticed brass kisses on the receiver in front of the ejection port that weren't there first time out. So, too much gas just may be the main culprit here with the failure to feed problems. What he means by the last part of his statement is that the bolt is flying back with so much force and rebounding off the buffer so hard that it is getting back to the magazine before its spring has enough time to have the next cartridge ready for pickup. That still doesn't explain my lockup yesterday but I've only used CLP as my lubricant and I've kept my locking lugs bone dry, something I learned by shooting HK's for many many years where to DO NOT lube the trunnion. So, I will try again before returning it. That will be a couple weeks though. I will post the results.


I didn't put anything in there about the possibility of carbon build up because I always keep the gas system meticulously clean. There is only one exception to that. On my AK's, I almost never clean the gas tubes unless I'm shooting corrosive ammo. I do however always clean the gas piston very well.
 
Wilhelm -

I've used several different types of ammo in this weapon to test feeding issues and only had to adjust the gas system once for poor ammo performance - some new production off brand ammo I bought ... and no, it wasn't Ted Nugent ammo or Turkish stuff. :googlie I run the weapon somewhat wet and probably use waaaay too much lubrication, but it has always seemed to help in any new SAs I've bought during any break in period - unlike my 1989 Chinese AK which didn't need any break-in period *(see below). The over lubing helps with my PTR44 too.

I've also had some mag. feeding issues with this weapon 1 or 2xs, but only from mags. I bought that didn't come with the rifle. The spring pressure becomes non-effective on some of these old mags. when loading them up. Those particular mags. don't work well in mine with more than 10 rounds - it just ain't there. Here's a video of me shooting mine with an old mag. - with only 10 rounds in it - and an occasional flash from the ejection port which I think is Rem Oil lubricant igniting on occasion due to over-lubrication ? Maybe ... ? dunno...

https://www.youtube.com/watch?v=5vmIKqAOU5w&feature=youtu.be

It works perfectly with just 10 rounds, which bites cuz I hate reloading mags. as much as the next guy. But it is what it is when you buy these ZB mags. Ze Be working, Ze Be kinda working, or Ze Be a POS.

Don't give up the ship yet. And thank you for producing the most useful thread I've ever read relating to any firearm I own.

Doug in Alaska (gettin cold)

P.S. - if you wanna sell that fake "original" FG42 mag. for $50, let me know. :thumbsup:

* I bought another Polytech Dbl. underfolder recently [NIB safe queen, bitch] to replace the one I'd sold to get the FG42. Happy Happy - Joy Joy !!
 
And thank you for producing the most useful thread I've ever read relating to any firearm I own.


P.S. - if you wanna sell that fake "original" FG42 mag. for $50, let me know. :thumbsup:


As Nick Cage would say.......That's high praise.

Thanks buddy!

P.S. I'll send that magazine right out to you first thing in the morning.
 
Yesterday, I took the FG42 out to the range again. My plan was to shoot 100 rounds. Prior to heading out, I did the following:


1. Set the gas regulator to the low gas setting.


2. Greased the locking lugs with Swiss Automatenfett.


3. Greased the cam slot on the bolt with same.


4. Packed the two magazines numbered to the rifle.


5. Packed 40 rounds of Romanian surplus dated 1973 and 60 rounds of Portuguese surplus (10rds. 1959, 30rds. 1961 and 20rds. 1973).


I am pleased to report that the rifle itself functioned flawlessly. I wasn't pounding the rounds through it but I was shooting fast enough that I had a decent mirage going on when looking through the scope. I took the muzzle brake off for about ten rounds and there is quite a noticeable difference in recoil with it off. I still can't report on accuracy because I was getting different POI because of the various ammunition I took along. I can tell you that accuracy so far is on par with a good SKS. A better trigger would help but familiarity with the rifle should improve the groups too. Charging effort was the same whether the rifle was cold or hot and whether there was a round in the chamber or not. I think we're making progress. Another 500-600 rounds like this and I'll call it good.


Now for the bad. At round 90, a part fell off onto the table. It turned out to be the band screw from the front mount. I checked the rear one and its screw was ready to fall out. 8mm recoil really puts things to the test. The scope seems to still be tight in the bands but that's probably because the locking levers are holding everything tight. If I were to loosen them, I believe that I'd have a mess. So, I discontinued shooting the FG for the day and headed home. Now I need to contact Mr. Adams and ask for advice about how to proceed; I'm thinking locktite......


Here is a random sampling of casings with three steel ones on the right and three brass ones on the left:


Not nearly as beat up as before.


And the necks on those same casings:


Prior to cleaning, I took a few pictures to show the surprisingly low funk level at 90 rounds. Here we have the:


Gas plug:


Gas block and front of the hand guard:


Muzzle brake:


and gas piston:


Next are a couple pictures of the greased areas prior to cleaning.


One of the locking lugs:


The cam slot and other locking lug:


Cleaning this rifle is pretty easy because residue seems to stay confined to a few small areas. I had taken an HK along with me too (I pretty much ALWAYS take an HK too!) and I'm used to the mess they make so this thing is positively tidy compared to them. With nothing more than on old toothbrush and a little Hoppes #9, everything was done in no time.

Here's the gas plug post cleaning:


And the piston:


Everything else (other than the barrel of course and the trunnion) needed nothing more than a wipe with a rag and a little solvent. Getting into the trunnion area is a bit of a chore since it's so deep in there and protected by knife sharp edges if you try to go in through the ejection port and, to a lesser extent, through the magazine well. It quickly teaches you to use a toothbrush or get nasty cuts on your fingers!


While wiping down the trigger group, a part fell off. It turned out to be the knob from the safety which had unthreaded itself from the detent! What the hell?? Well, since it was already partially apart, I figured I'd take the safety out of the trigger housing and get a picture of what the safety looks like disassembled:


As I said earlier, the 8mm round really puts components to the test. Things WILL disassemble themselves if they aren't properly fastened together. So I put the safety back together.

Here's the knob screwed back in place on the detent:


And here's what it looks like after I staked it in place:


Note to SMG......you might want to consider doing that or at least locktite it.
 
Okiedokie. While it's all clean and dry, let's take a look at some wear marks with approximately 210 rounds through the rifle. I'm posting these so that you know what to expect as you shoot the rifle and it starts to wear in. I assume they are normal even though I personally am not normal.....


Lets start with the tip of the firing pin:


It kind of looks like a Polaris missile doesn't it?


The rest of the firing pin showing marks from interaction with the yoke and the inside of the bolt:


The firing spring guide:


The right rear of the yoke:


Yep, that's a divot wearing in there. SMG says it's normal so don't wig out when this happens.


The front left of the yoke:


That's NOT a crack. It's just scratches in the bluing.


Bolt lugs:


These next two are interesting. They show wear marks behind the lugs on the body of the bolt. I believe this to be from minimal clearance between the bolt and the trunnion and it helps explain (in my mind anyways) why these rifles are prone to locking up if they are run dry:


That's not a complaint, just an observation. I've been contacted by several owners now and they have experienced the "FG42 lockup" as well so this isn't just my rifle. SMG says in their instructional video that these rifles seem to run better and better the more you shoot them and I have no reason to doubt their claim. The wear marks shown above seem to be proof of that. So my advice is.....slap some grease on there and run the hell out of it!!


Speaking of that, based on accumulated data so far, here's my recommendation so far for lubrication after cleaning:


1. A drop of good oil (I use Break Free) on the rear of the extractor.


2. A very little bit of grease on the firing pin where it contacts the inside of the bolt and where it contacts the yoke.


3. A very little bit of grease on the firing spring guide where it contacts the inside of the bolt.


4. A little more grease on the yoke where it contacts the cam slot in the bolt.


5. A little more grease in the rear of the bolt cam slot after the entire bolt group is assembled just before putting everything into the receiver.


6. A little more grease on the locking lugs paying attention to NOT smear it on their fronts (enough will work its way there in use) or on the bolt face.


As an example, let me show you what my lugs look like greased just before it all goes into the receiver:


SMG should give you some idea about proper lubrication procedures in their manual but they don't so learn form my problems, stupidity and experimentation. Admittedly, most of my problems come from my stupidity but not all of them. HAHA!! As for what grease to use, I'm using Swiss Automatenfett but any quality high temperature grease should work just fine I would think.


Okiedokie.....that's it for now. Eventually, I'll get this whole scope thing worked out and get some decent accuracy tests going on.
 
Super Review in depth! Almost makes me want to fire up my original at the range but after reading this edition, particularly about the effect of the 8mm recoil on the gun parts, I'll continue to hold the line and only vicariously experience the results through you. I have nightmares of mine flinging off irreplaceable parts after 50 rounds!!
 

Military Rifle Journal
Back
Top