

You are using an out of date browser. It may not display this or other websites correctly.
You should upgrade or use an alternative browser.
You should upgrade or use an alternative browser.
DK store open!!
- Thread starter Ravelo
- Start date
mostpeople
Senior Member
dingo
Senior Member
They are FA bolts, with original specks. They are going quickly as the kits. DIt looks like it has proper shaped claws and is the proper width on the bottom too. Schweet!
Well, I'm glad I was able to snag one. Just last week, I was finally able to snag an original after all these years. Now I have another option should I need it. I'm very grateful that you've brought these in.
Are you planning on bringing in any more of the laminated stocks?
Are you planning on bringing in any more of the laminated stocks?
Alrighty, let's take a quick look at the new production SSD bolt compared to a bolt from the 200 PTR44's that came in and an original WWII production example. I won't get all of it done tonight but I'll at least make a start. If you really don't care about all of my drivel and you just want to know whether or not I am satisfied with the new SSD.....yes, my initial opinion is very favorable.
Now....is it properly hardened? I don't know. According to Dingo, all hardening is now done in house and it's correct. I have no reason to doubt him but I'm not a metallurgist. It is also supposed to be 100% in spec. Is it? I don't know because I'm not an engineer. All I can say is that it looks good to me and it seems to headspace just fine in my rifle using the primitive methods I have at hand.
When comparing these bolts, you have to remember that, even when looking at a selection of original bolts, you WILL see a fair amount of variation in the details. I have no idea how many machining cuts it takes to make one of these things but it's clearly a complex part, perhaps the most complex of the entire rifle. But while you see variation in details, the critical dimensions SHOULD be pretty close from bolt to bolt. What are those critical dimensions? Well, like I said, I don't know......I'm not an engineer. All I can do is tell you what I see with my untrained eyes. Okiedokie, let's begin.
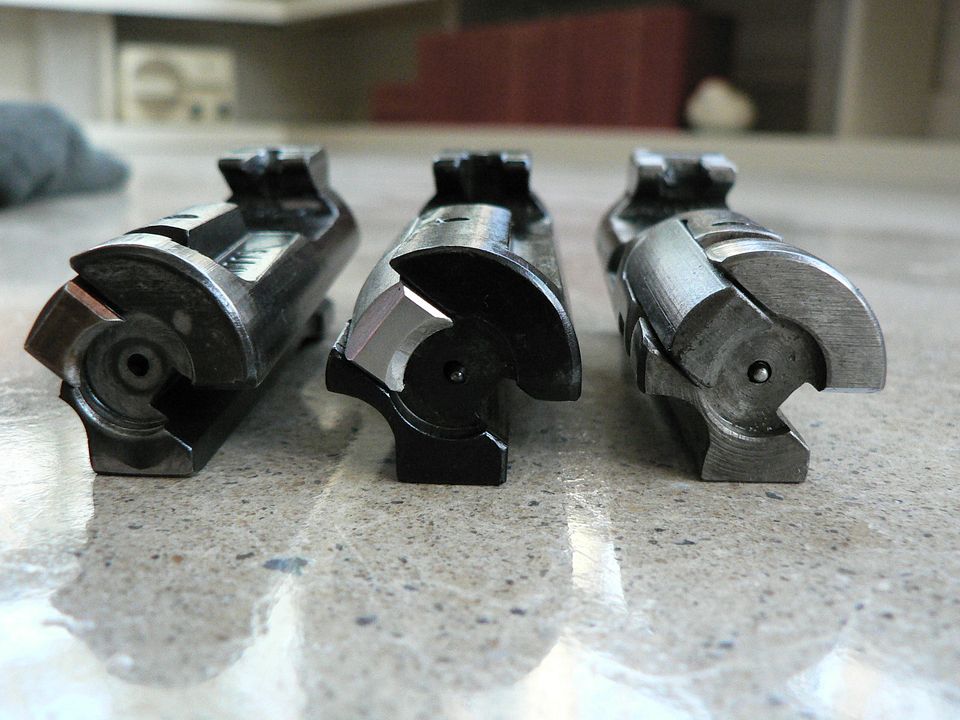
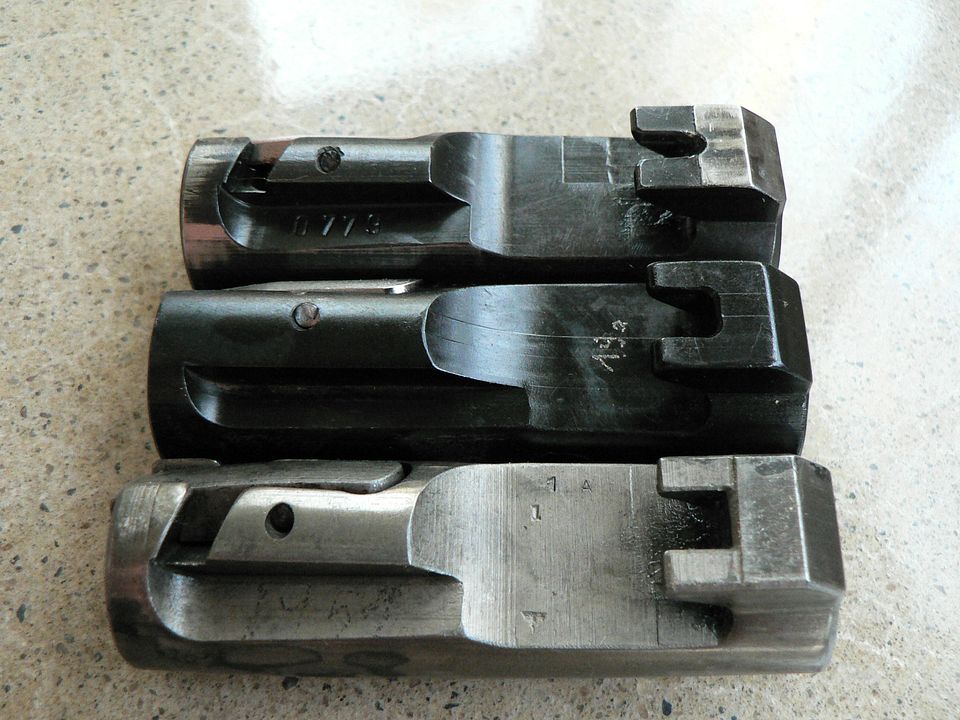
Here are the three we are going to look at:
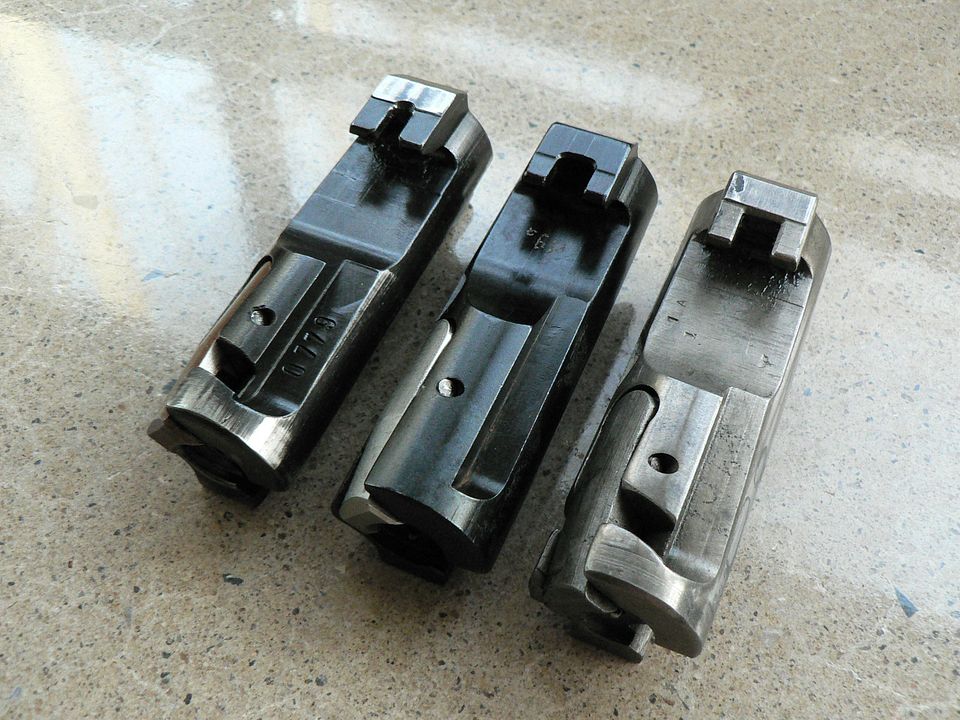
On the left is the original bolt that came with my PTR44 in 2012 or whenever the hecks they were imported. In the middle is the new SSD jobber and, on the right, is an original WWII example made by I don't know who. In the pictures that follow, any time you see all three lined up, the order is as shown above. If it isn't, I'll tell you. If they are presented stacked, the PTR44 bolt is at top and the WWII example is on the bottom. Got it?
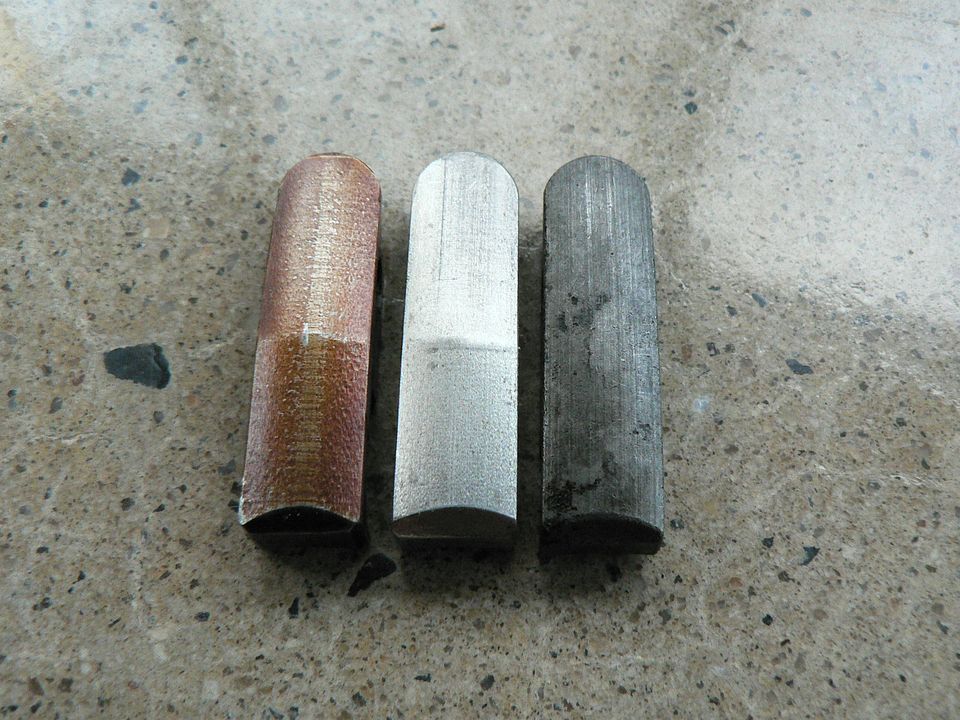
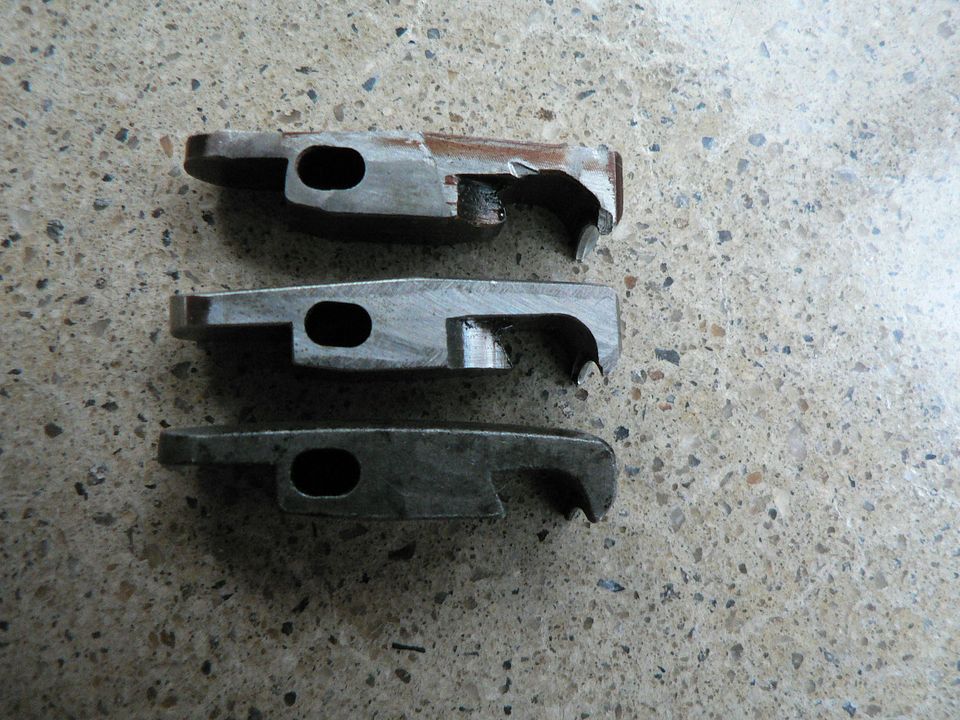
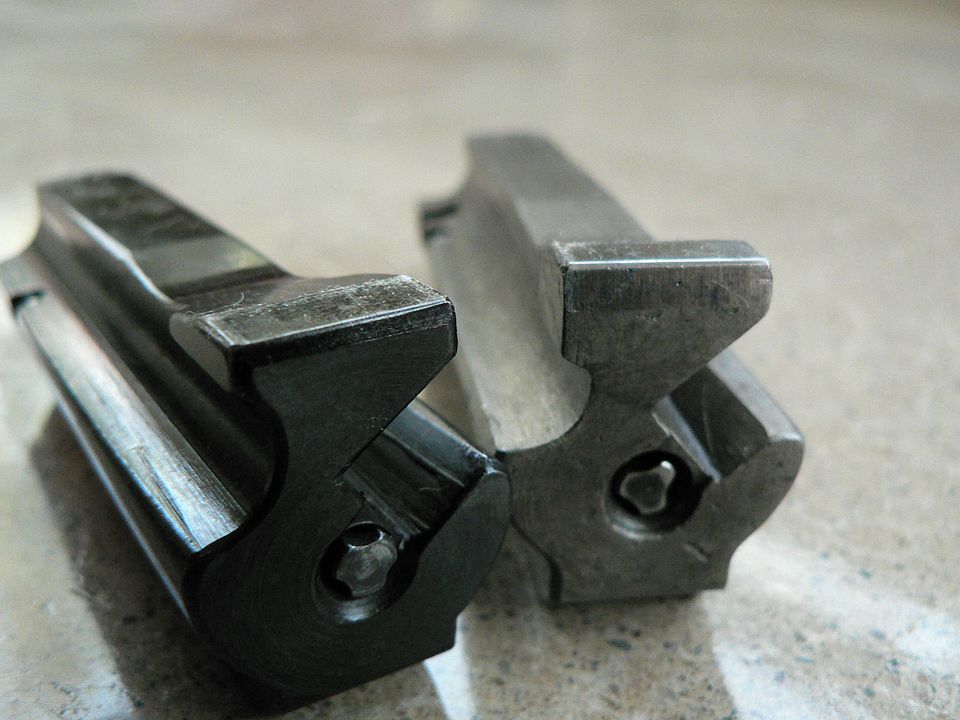
Here are the unlocking claws:
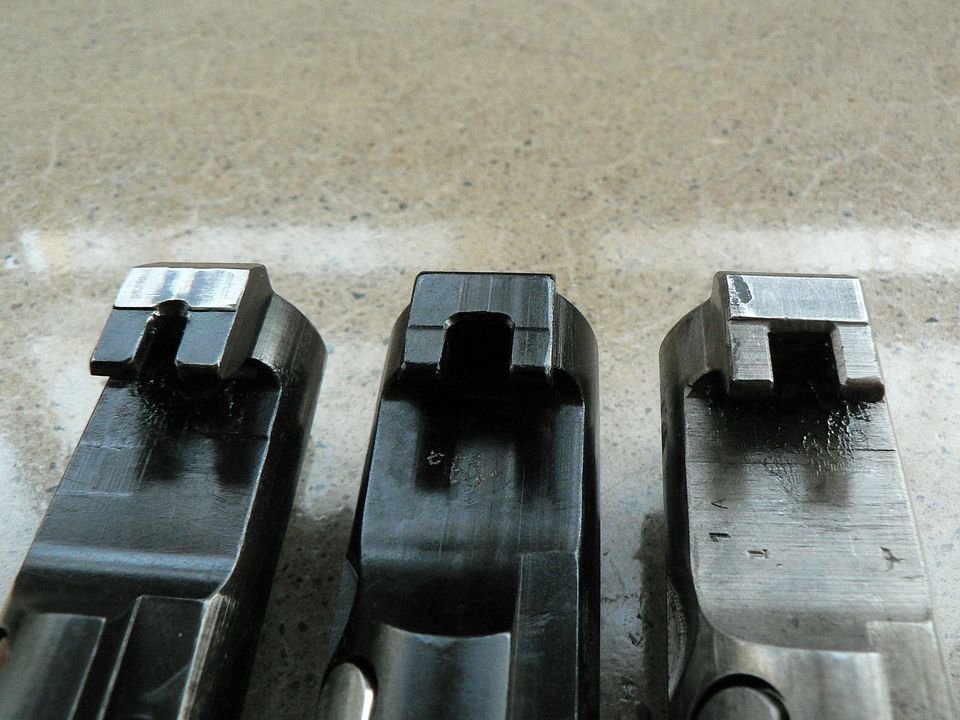
Notice that the gap between the claws on the PTR bolt is quite a bit different from the other two. By the way, the WWII bolt appears to be in the white while the other two are blued.
The new SSD bolt is electropenciled with what appears "19a":
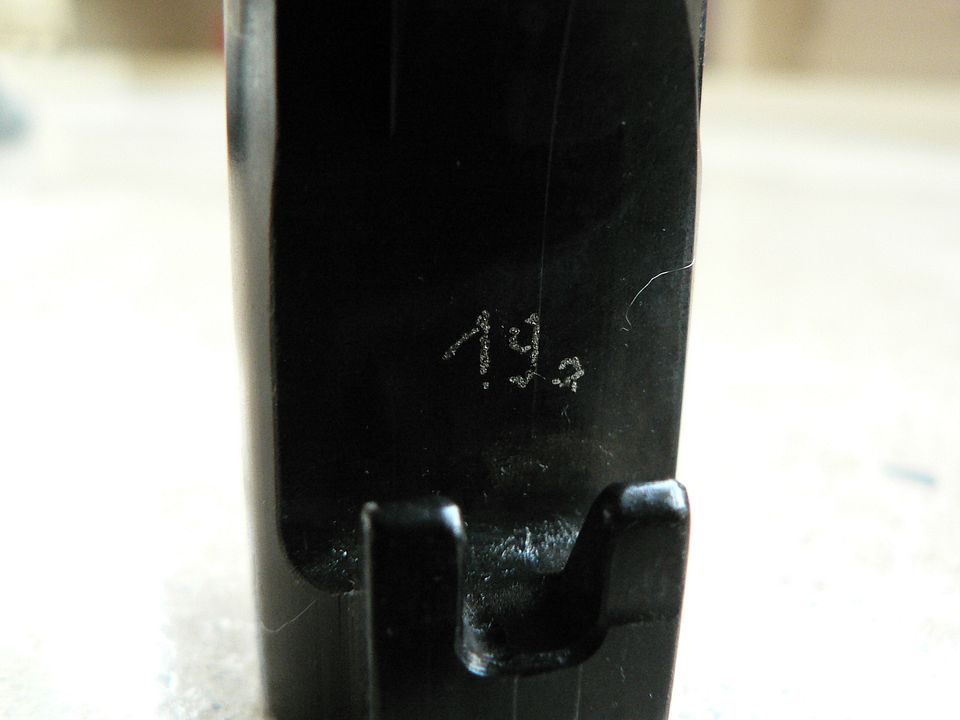
Dingo, I know you're reading this. Any idea what that means? I notice that the stock photo on the DK Production Group website appears to be "20a".
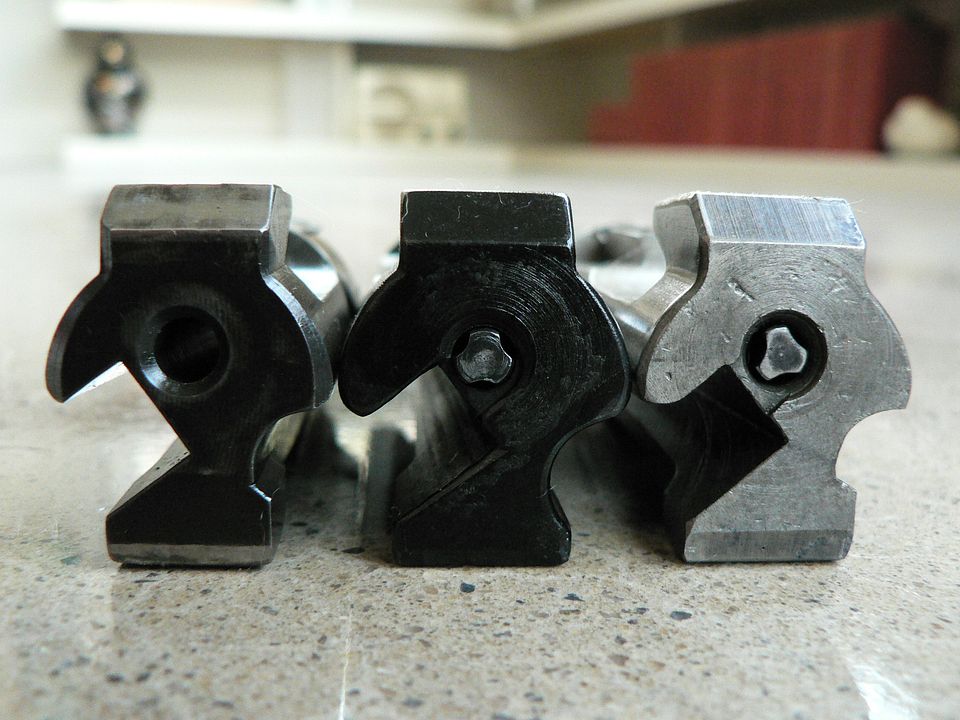
Bolt faces:
They all look about the same. I can tell you that my PTR44 bolt seems to rattle around in the receiver a bit more than the other two and the action seems to move back and forth more smoothly by hand with the other two mounted.
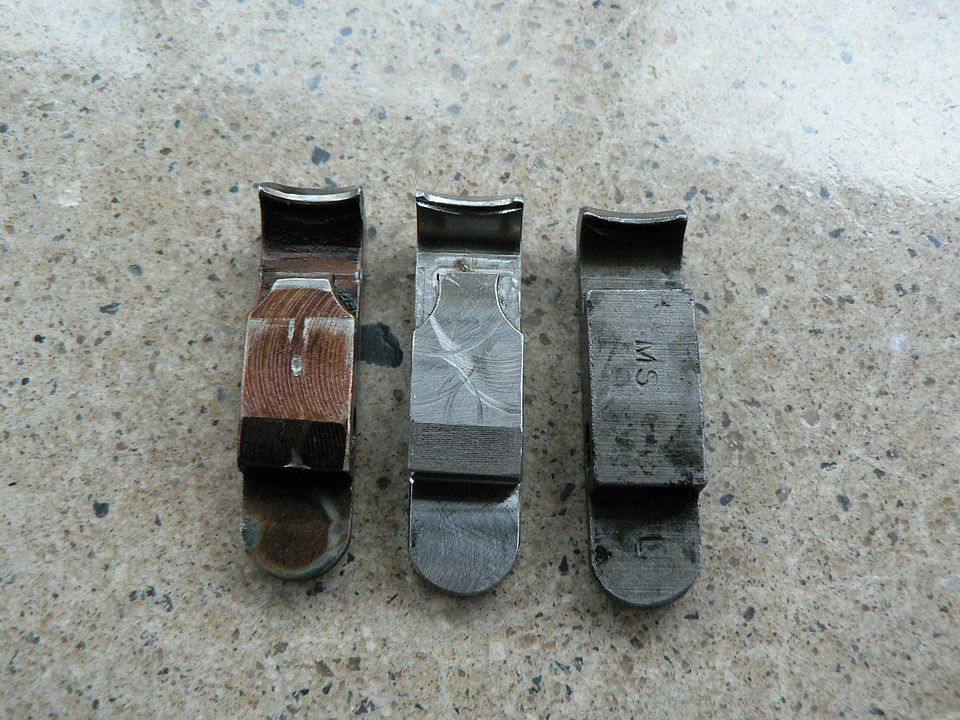
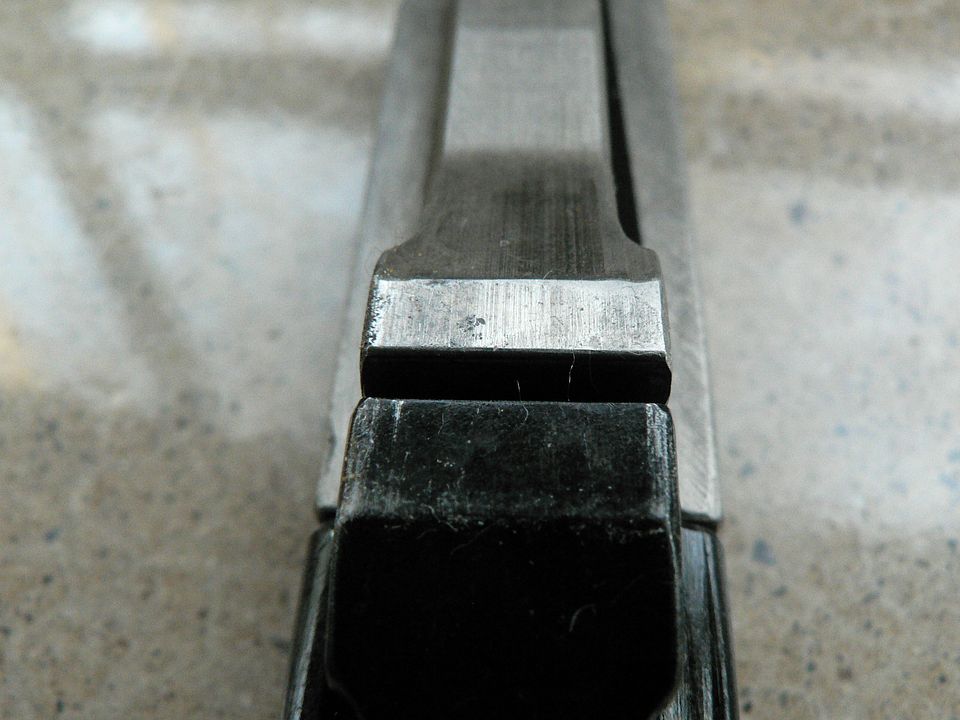
Rear:
The WWII bolt came sans a firing pin so the one you see there came out of the PTR bolt. Note that the firing pin hole machining detail differs on the PTR bolt. The other two are almost identical.
Bottom:
All look about the same. However, as we all know, the PTR bolt is thinner at the bottom back to allow for the restrictor that was placed in the PTR receiver. We'll look at that more closely in a bit.
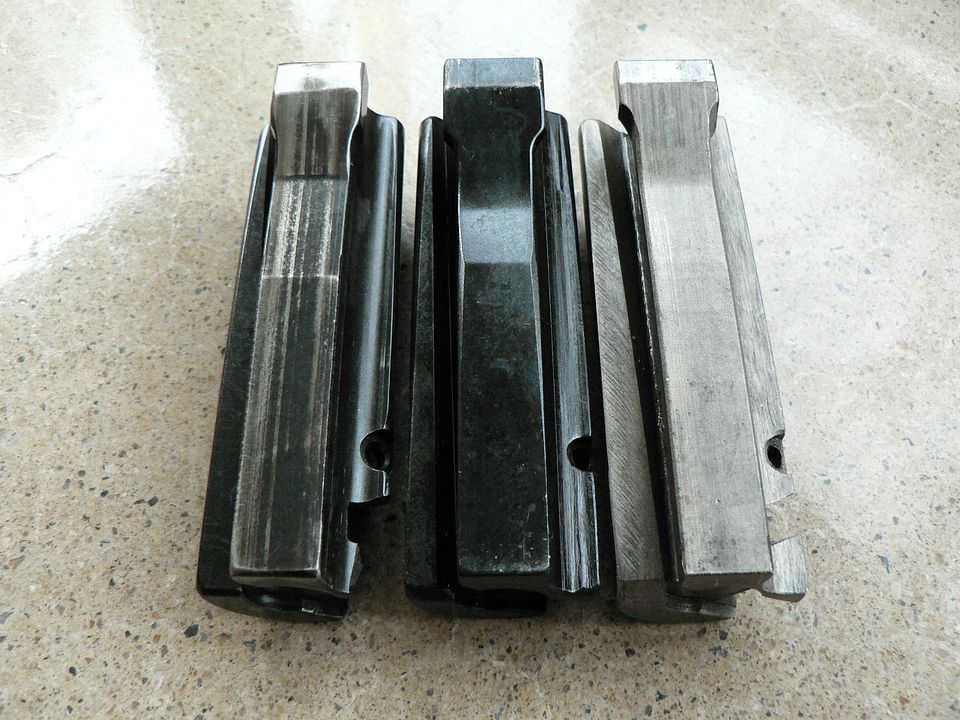
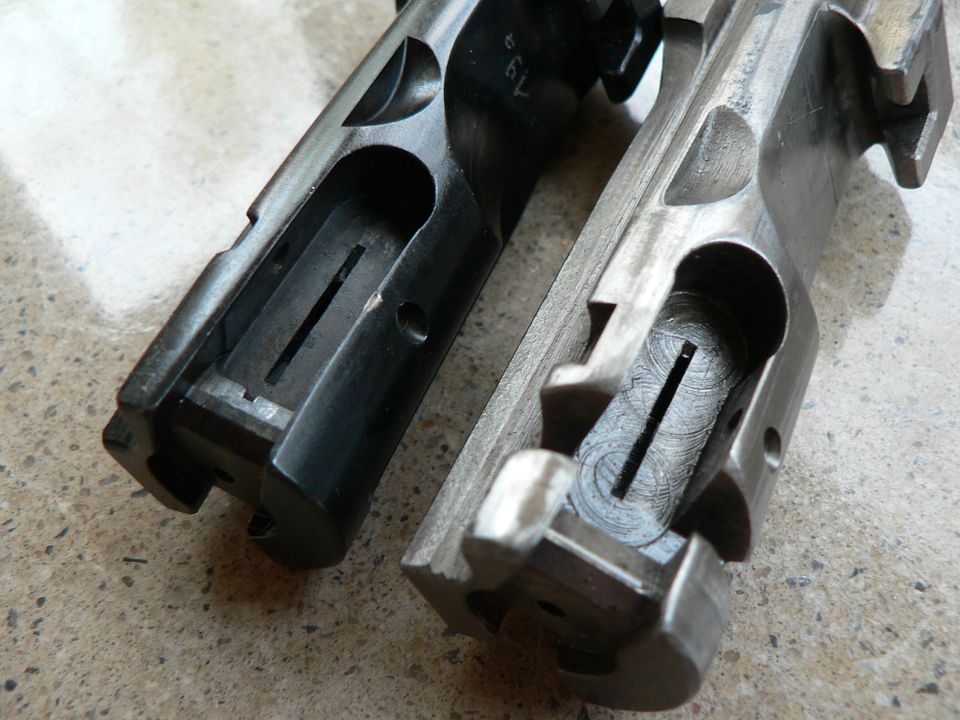
Left side:
The astute observer will notice that various details are different on the PTR bolt compared to the other two. I could go into a long description but anyone who is reading this is already an MP44 kook so you'll spot the differences just fine. One thing I do want to point out though is the rough machining in the ejector slot on the wartime bolt. Personally, I like the rough look better. The only complaint I have about the aesthetics of the BD44 is that it's too pretty. I wish it had that wartime expedient look about it so common in the vast majority of MP44's.
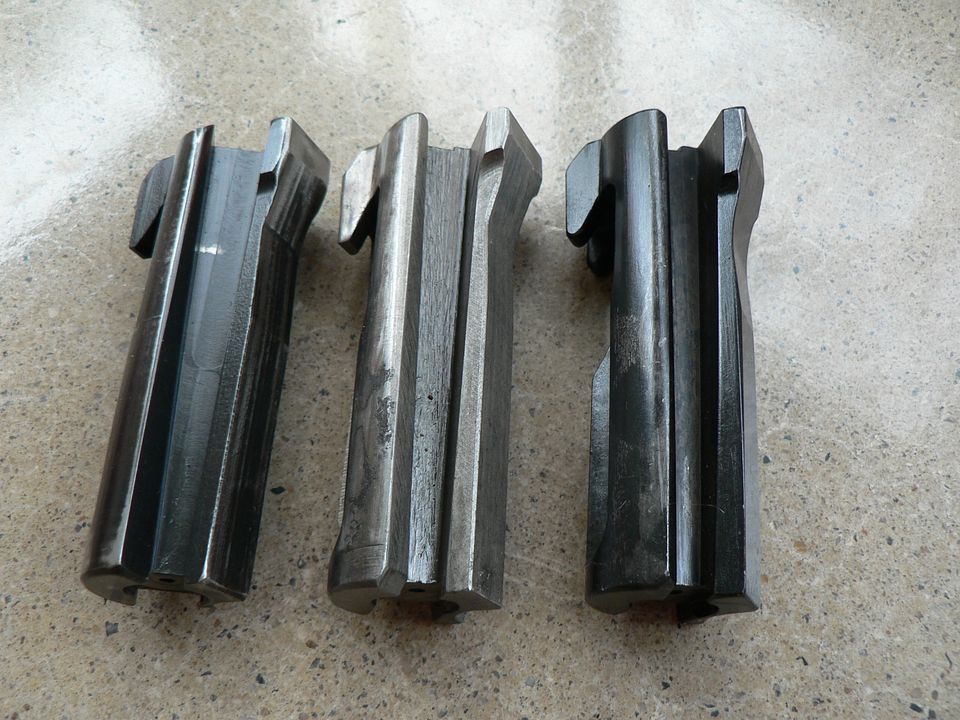
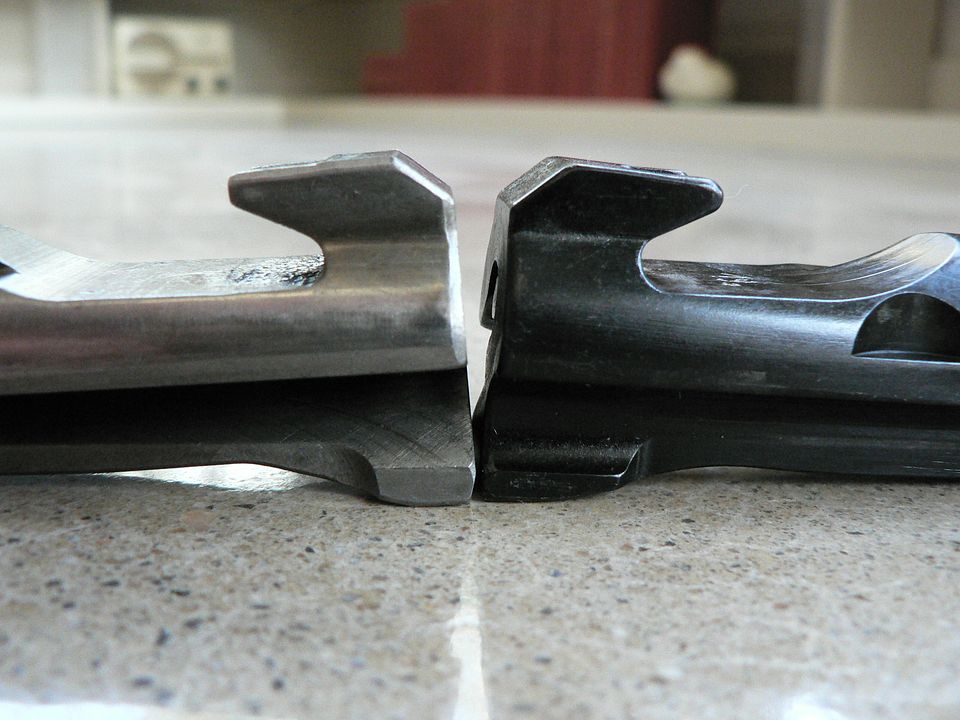
Right side:

I screwed up here and reversed the wartime and new made bolts. Sorry about that. Important to note here is that the profile of the heel is considerably different on the new SSD bolt. It doesn't seem to have any effect on how well it locks into battery though. Still, I assume the reason that area is so meaty on the original is because a lot of force is exerted on it when the round is ignited. Is this cause for concern? I'm not an engineer. You tell me. I guess the only way to know for sure is to keep an eye on it while you shoot the hell out of it.
Also of note is the fact that a chunk has broken off of my PTR bolt at the bottom front of the extractor slot. That's almost certainly my fault though. When I originally bought this, the extractor pin was so tight, I used a punch and hammer in an effort to remove it and it still wouldn't budge. Well, that broken off area took the brunt of the force the way it was laying on my work bench. Now, I didn't beat the hell out of it but still, it wasn't designed to take shearing forces like that. The MP44 Wizard spread a little of his magic and now the pin fits as it should. After he fit the pin, the bolt was still intact but 80 rounds later, that piece was nowhere to be found. I know the Wizard didn't cause that though. I'm taking the blame here and assuming my work with a punch and hammer probably weakened it. In the end, I don't think it really matters because the rifle seems to function just fine as it is. Besides, I don't plan on ever using this bolt again anywho.
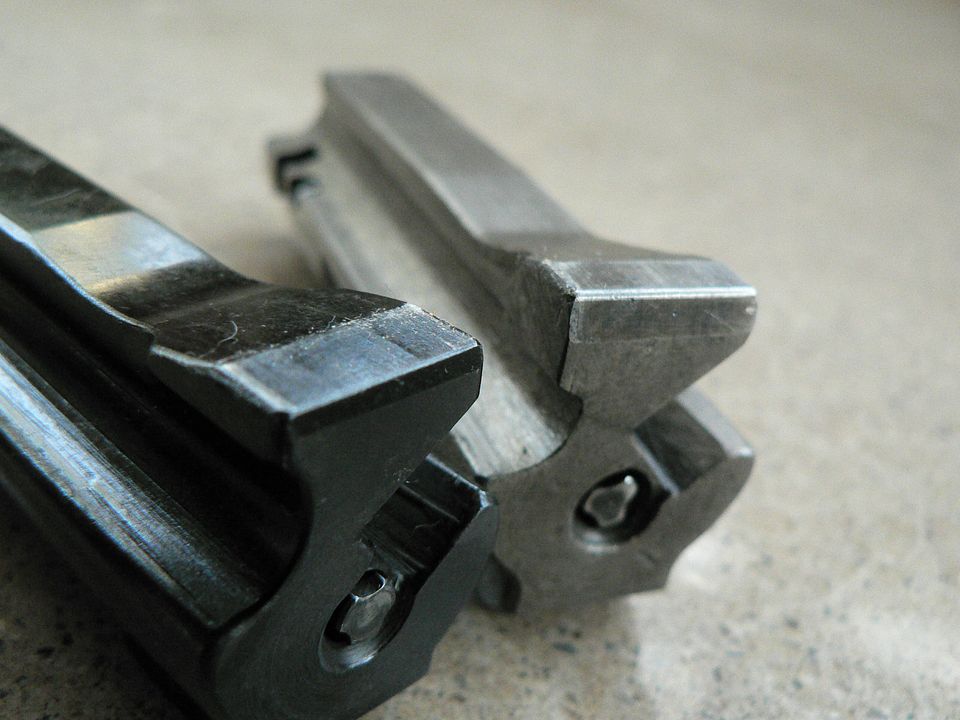
Top:
The area where the serial number would be is machined somewhat differently on the new bolt. No biggie so long as it works.
I have more to present but that's all for this evening. I'll try to be back tomorrow night and finish this up.
Now....is it properly hardened? I don't know. According to Dingo, all hardening is now done in house and it's correct. I have no reason to doubt him but I'm not a metallurgist. It is also supposed to be 100% in spec. Is it? I don't know because I'm not an engineer. All I can say is that it looks good to me and it seems to headspace just fine in my rifle using the primitive methods I have at hand.
When comparing these bolts, you have to remember that, even when looking at a selection of original bolts, you WILL see a fair amount of variation in the details. I have no idea how many machining cuts it takes to make one of these things but it's clearly a complex part, perhaps the most complex of the entire rifle. But while you see variation in details, the critical dimensions SHOULD be pretty close from bolt to bolt. What are those critical dimensions? Well, like I said, I don't know......I'm not an engineer. All I can do is tell you what I see with my untrained eyes. Okiedokie, let's begin.
Here are the three we are going to look at:
On the left is the original bolt that came with my PTR44 in 2012 or whenever the hecks they were imported. In the middle is the new SSD jobber and, on the right, is an original WWII example made by I don't know who. In the pictures that follow, any time you see all three lined up, the order is as shown above. If it isn't, I'll tell you. If they are presented stacked, the PTR44 bolt is at top and the WWII example is on the bottom. Got it?
Here are the unlocking claws:
Notice that the gap between the claws on the PTR bolt is quite a bit different from the other two. By the way, the WWII bolt appears to be in the white while the other two are blued.
The new SSD bolt is electropenciled with what appears "19a":
Dingo, I know you're reading this. Any idea what that means? I notice that the stock photo on the DK Production Group website appears to be "20a".
Bolt faces:
They all look about the same. I can tell you that my PTR44 bolt seems to rattle around in the receiver a bit more than the other two and the action seems to move back and forth more smoothly by hand with the other two mounted.
Rear:
The WWII bolt came sans a firing pin so the one you see there came out of the PTR bolt. Note that the firing pin hole machining detail differs on the PTR bolt. The other two are almost identical.
Bottom:
All look about the same. However, as we all know, the PTR bolt is thinner at the bottom back to allow for the restrictor that was placed in the PTR receiver. We'll look at that more closely in a bit.
Left side:
The astute observer will notice that various details are different on the PTR bolt compared to the other two. I could go into a long description but anyone who is reading this is already an MP44 kook so you'll spot the differences just fine. One thing I do want to point out though is the rough machining in the ejector slot on the wartime bolt. Personally, I like the rough look better. The only complaint I have about the aesthetics of the BD44 is that it's too pretty. I wish it had that wartime expedient look about it so common in the vast majority of MP44's.
Right side:
I screwed up here and reversed the wartime and new made bolts. Sorry about that. Important to note here is that the profile of the heel is considerably different on the new SSD bolt. It doesn't seem to have any effect on how well it locks into battery though. Still, I assume the reason that area is so meaty on the original is because a lot of force is exerted on it when the round is ignited. Is this cause for concern? I'm not an engineer. You tell me. I guess the only way to know for sure is to keep an eye on it while you shoot the hell out of it.
Also of note is the fact that a chunk has broken off of my PTR bolt at the bottom front of the extractor slot. That's almost certainly my fault though. When I originally bought this, the extractor pin was so tight, I used a punch and hammer in an effort to remove it and it still wouldn't budge. Well, that broken off area took the brunt of the force the way it was laying on my work bench. Now, I didn't beat the hell out of it but still, it wasn't designed to take shearing forces like that. The MP44 Wizard spread a little of his magic and now the pin fits as it should. After he fit the pin, the bolt was still intact but 80 rounds later, that piece was nowhere to be found. I know the Wizard didn't cause that though. I'm taking the blame here and assuming my work with a punch and hammer probably weakened it. In the end, I don't think it really matters because the rifle seems to function just fine as it is. Besides, I don't plan on ever using this bolt again anywho.
Top:
The area where the serial number would be is machined somewhat differently on the new bolt. No biggie so long as it works.
I have more to present but that's all for this evening. I'll try to be back tomorrow night and finish this up.
Last edited:
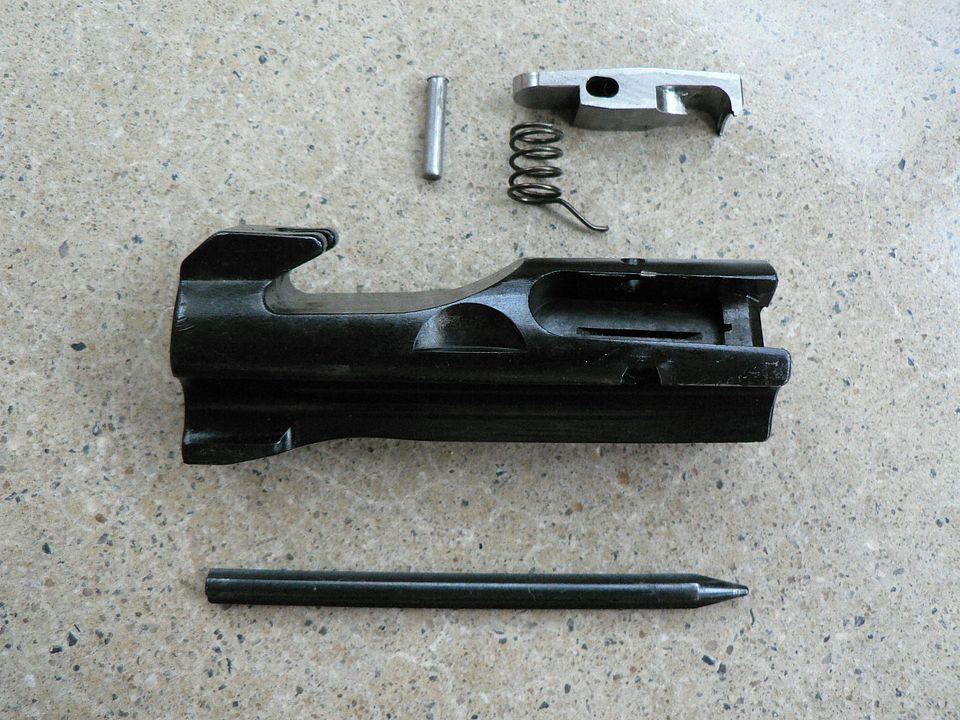
Next up are the extractors.
Top view with front towards bottom of frame:
Bottom:
You certainly aren't going to confuse SSD made ones with originals. They work just fine though and look identical when installed.
Front:
The edges on the SSD made extractor claws are very sharp and pointy compared to the original. It probably wouldn't be hard to actually cut yourself.
Side:
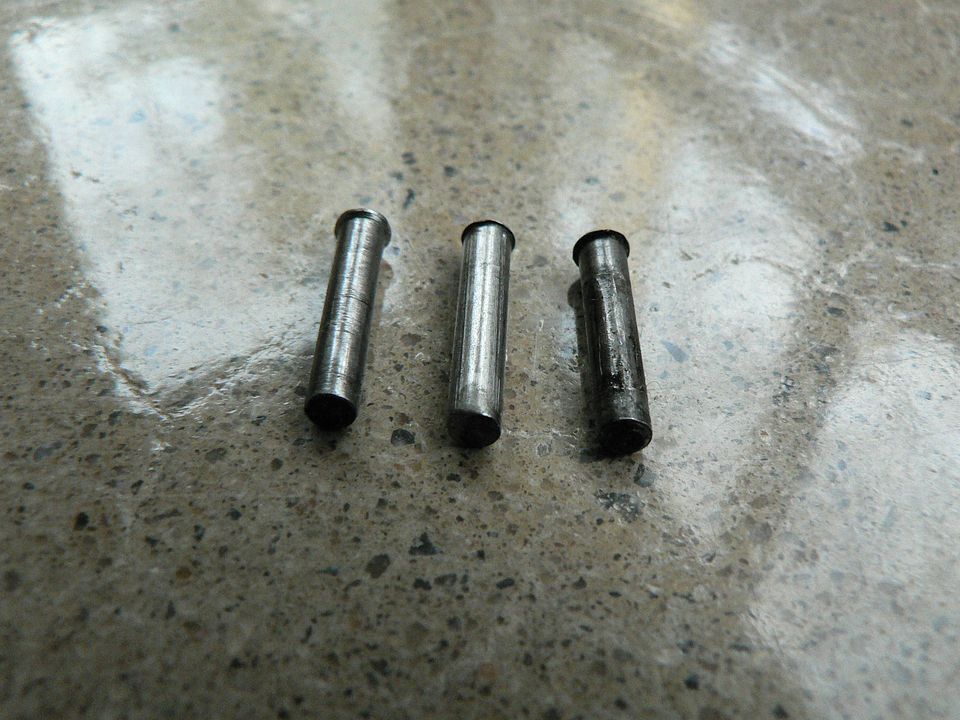
Extractor retaining pins:
Extractor/firing pin retainer spring:
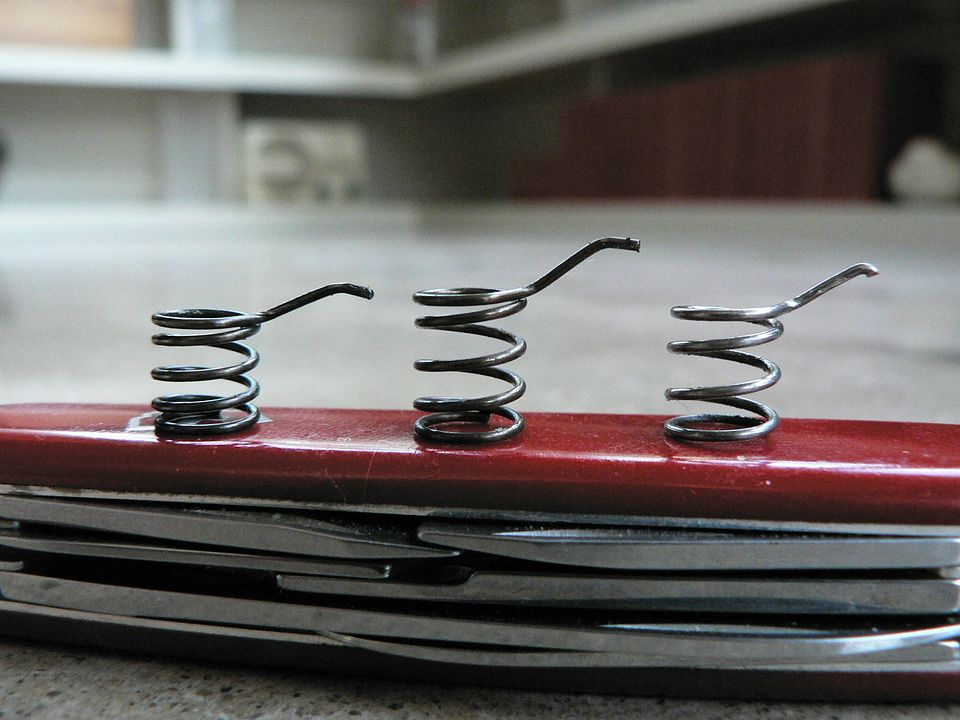
Note that the SSD springs have an extra coil. However, the original uses a stouter wire. The net effect is that both create the same tension on the extractor. The one that came with the PTR44 when new does not retain the firing pin as well as the other two due to the different bend of it but it still does its job just fine.
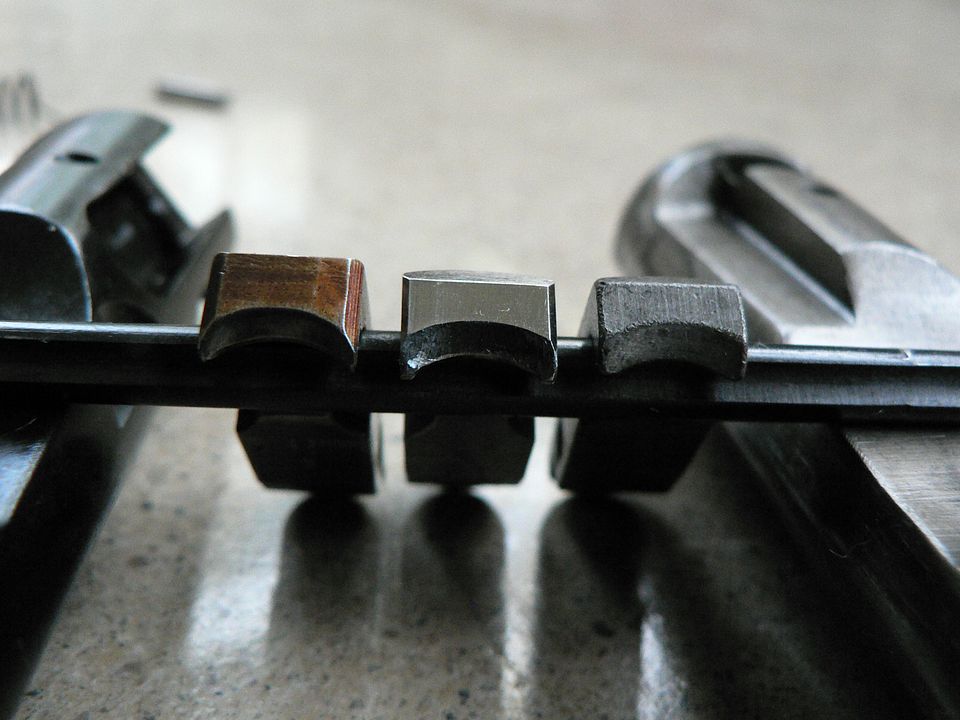
This one is comparing the width of the heel on the PTR44 bolt to an original:
You can clearly see that the PTR bolt is thinner here to pass by the restrictor tabs on the stock pin reinforcing block.
And the new production SSD (bottom of frame) compared to the original:
They are the same width. I assume this is what Dingo means when he refers to these as "full auto" bolts.
That's it for comparing all three. Next, we'll look a few detail pictures comparing the new production SSD bolt to an original.
The ejector slot:
Note that the SSD jobber lacks the late lateral cut. Again, we see the neato late war machine marks on the wartime example.
Flat spot where the head of the extractor pin rests:

I'm pleased to report that all parts are interchangeable between all three bolts.
These last three pictures illustrate the considerable machining differences at the heel where it engages the locking block. As far as I can tell, the new bolt locks up just fine and there is no operational difference between the two. But the fact is, for whatever reason, they are different.
Side view with original on the left:
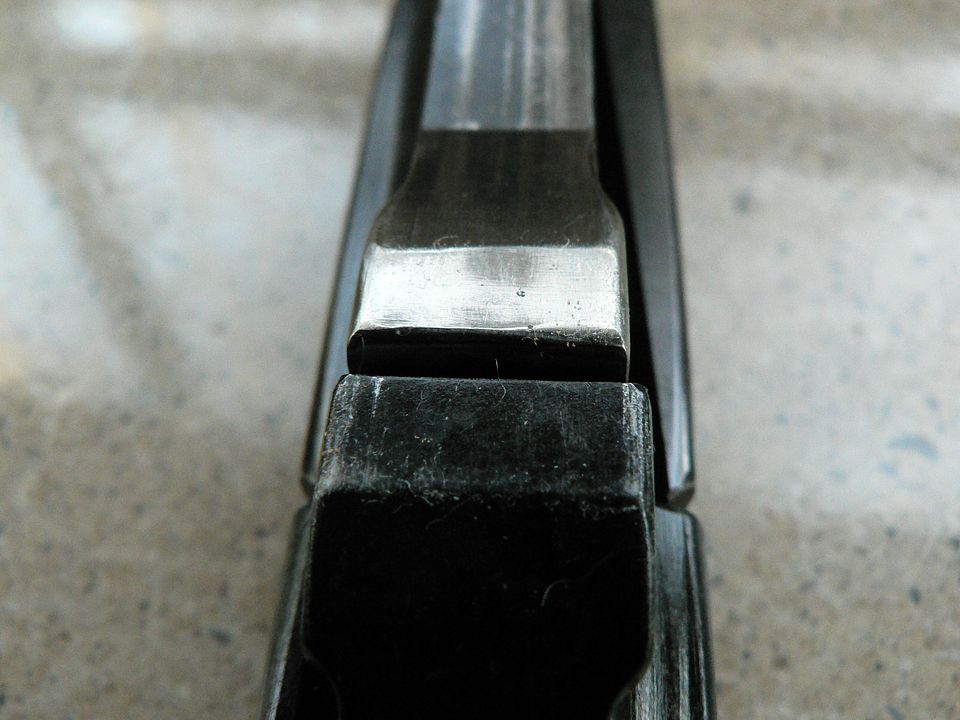
Detail of the bevel that directly engages the locking block:
I'm neither machinist nor engineer, but my assumption is that the bevel at the rear of the heel is created when the bolt is ground to final length. And I also assume that the angle of that bevel is such that it butts flat against the locking block. You guys who are more knowledgeable than me can either confirm or correct me on those two things please.
Alrighty, that's it. As of this date, I've only fired my rifle using the matching numbered bolt that came with it and my round count is just under 700 rounds. I stopped shooting it some time back for fear of the bolt breaking. After years of searching, I only recently found the original bolt and I got all excited. Of course, as often happens, once you finally find something you couldn't find for forever, they start falling from the sky. About a week after I found the original, the new production SSD bolts showed up so I figured I might as well grab one of those too while I could. My plan is to shoot the rifle using the WWII bolt and keep the SSD of a backup which I figure I'll never need, but I'll try out the SSD one for about 100 rounds too to see how it functions. It's early March and comfortable shooting weather is just around the corner. When I finally do go, I'll report my findings in my regular PTR44 thread which has sat dormant for so long because I couldn't find a bolt. I hope you guys find this useful and I also hope that Dingo can bring in lots and lots of new parts for all us MP44 nutjobs.
Top view with front towards bottom of frame:
Bottom:
You certainly aren't going to confuse SSD made ones with originals. They work just fine though and look identical when installed.
Front:
The edges on the SSD made extractor claws are very sharp and pointy compared to the original. It probably wouldn't be hard to actually cut yourself.
Side:
Extractor retaining pins:
Extractor/firing pin retainer spring:
Note that the SSD springs have an extra coil. However, the original uses a stouter wire. The net effect is that both create the same tension on the extractor. The one that came with the PTR44 when new does not retain the firing pin as well as the other two due to the different bend of it but it still does its job just fine.
This one is comparing the width of the heel on the PTR44 bolt to an original:
You can clearly see that the PTR bolt is thinner here to pass by the restrictor tabs on the stock pin reinforcing block.
And the new production SSD (bottom of frame) compared to the original:
They are the same width. I assume this is what Dingo means when he refers to these as "full auto" bolts.
That's it for comparing all three. Next, we'll look a few detail pictures comparing the new production SSD bolt to an original.
The ejector slot:
Note that the SSD jobber lacks the late lateral cut. Again, we see the neato late war machine marks on the wartime example.
Flat spot where the head of the extractor pin rests:
I'm pleased to report that all parts are interchangeable between all three bolts.
These last three pictures illustrate the considerable machining differences at the heel where it engages the locking block. As far as I can tell, the new bolt locks up just fine and there is no operational difference between the two. But the fact is, for whatever reason, they are different.
Side view with original on the left:
Detail of the bevel that directly engages the locking block:
I'm neither machinist nor engineer, but my assumption is that the bevel at the rear of the heel is created when the bolt is ground to final length. And I also assume that the angle of that bevel is such that it butts flat against the locking block. You guys who are more knowledgeable than me can either confirm or correct me on those two things please.
Alrighty, that's it. As of this date, I've only fired my rifle using the matching numbered bolt that came with it and my round count is just under 700 rounds. I stopped shooting it some time back for fear of the bolt breaking. After years of searching, I only recently found the original bolt and I got all excited. Of course, as often happens, once you finally find something you couldn't find for forever, they start falling from the sky. About a week after I found the original, the new production SSD bolts showed up so I figured I might as well grab one of those too while I could. My plan is to shoot the rifle using the WWII bolt and keep the SSD of a backup which I figure I'll never need, but I'll try out the SSD one for about 100 rounds too to see how it functions. It's early March and comfortable shooting weather is just around the corner. When I finally do go, I'll report my findings in my regular PTR44 thread which has sat dormant for so long because I couldn't find a bolt. I hope you guys find this useful and I also hope that Dingo can bring in lots and lots of new parts for all us MP44 nutjobs.
Last edited:
dingo
Senior Member
The numbers on the new bolts are new demands from the German government. All Bolts are now restricted and must have a serial number! We put it so you don't see it from the outside of the rifle. As to small differences on bolts: There was differences on the WW2 manufactured ones to, so they are identical to some original ones but not all.
Nice write up Wilhelm. Great pictures. One thing I can tell you is yes, There are a lot of machining steps in making a bolt. and a lot of set-up and layout.
I had a worn original to get measurements from. Wasn't mine so I had to send it back to the owner. Right now I'm working off of a drawing with most of the measurements given.
Unfortunately I'm a retired carpenter and I couldn't afford a bolt. Even if they had become available. So I had to make my own. But that is nothing new for me.
My bolt will not have that "scraping" groove on it. I don't use steel cases so I don't have to worry about debris left over from the finish on the steel cases. And it's one less machining step. I'd rather have the metal of the bolt there than a groove.
But for the life of me I can't figure out why that large cut on the left side is for. There is nothing inside the receiver or on the carrier that needs that cut to function. At least that I can see. And I can't find any reference to it. Maybe it's to increase the cyclic rate by making the bolt lighter.
Anyway, great write up and very helpful.
ETA. thanks heavy mech for the like. And the other guys too. I'm trying to be helpful.
heavy_mech
RKI- Reasonably Knowledgable Individual
No try brother; you're forging the path ahead. Much easier to do a build on anything after someone else has worked things out.ETA. thanks heavy mech for the like. And the other guys too. I'm trying to be helpful.
I followed others that built stuff I then built. So I am returning the favor. Even came up with some solutions myself. Always trying to help others with their builds.
Bending the flat was pretty easy once I had a jig made. And then realized I had bent it too far. Couldn't get the trunnion in. So I had to open it up and then put it in. Live and learn. After I put the trunnion in I used big C-clamps to close it up. And I found the way to really close the front end. It hadn't got as tight as I wanted it to. However after trying the modified Toth tool I found that it had really closed the front up. Turns out that the 1/8" pins I made to fit into those 2 grooves in the front forced the metal of the flat into the grooves in the trunnion. Now I had perfect fit. But only by accident.
So, even if you don't use a Toth tool, use those 1/8" pins to press the metal into the grooves. It works.
It's just too bad Dingo can't or won't bring in the FG-42 flats. I had plans. Would you believe a FG-42 in 7.62x54R and using Lathi mags. Somewhere I have the prints I made stored. Even bought an M-60 bolt body. The FG-42 works the same way. Or should I say the M-60 bolt works like an FG-42 bolt.
dingo
Senior Member
The FG42G flats are approved, but i found out it was not a marked for them. No use to make 100 of them and sell maybe 10, soon they must be serialized and require a background check so even less interesting for customers. DI followed others that built stuff I then built. So I am returning the favor. Even came up with some solutions myself. Always trying to help others with their builds.
Bending the flat was pretty easy once I had a jig made. And then realized I had bent it too far. Couldn't get the trunnion in. So I had to open it up and then put it in. Live and learn. After I put the trunnion in I used big C-clamps to close it up. And I found the way to really close the front end. It hadn't got as tight as I wanted it to. However after trying the modified Toth tool I found that it had really closed the front up. Turns out that the 1/8" pins I made to fit into those 2 grooves in the front forced the metal of the flat into the grooves in the trunnion. Now I had perfect fit. But only by accident.
So, even if you don't use a Toth tool, use those 1/8" pins to press the metal into the grooves. It works.
It's just too bad Dingo can't or won't bring in the FG-42 flats. I had plans. Would you believe a FG-42 in 7.62x54R and using Lathi mags. Somewhere I have the prints I made stored. Even bought an M-60 bolt body. The FG-42 works the same way. Or should I say the M-60 bolt works like an FG-42 bolt.
