Third Party Press

NC Gun-Show Find: Matching BNZ 45 Q-Block

mos

Junior Member
Greetings!

Traded for / bought this at a show in NC yesterday and would really like expert opinion on it. Overall, I think it's "right", but please comment. Details:

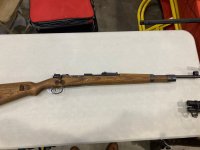
Matching Steyr 1945 Kriegsmodell
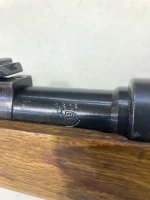
- Barrel 8626 q / WaA623 w/ bnz-shield
- Receiver Mod.98 / bnz45
- Bolt 8626 q (letter- stamp appears to be upside-down with the bottom of the "q" lost in the dished-out channel closest to the handle)
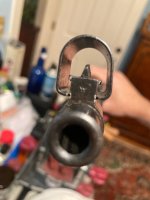
- Rear sight WaA / 26
- Rear sight-base WaA / 26
- Front sight hood (appears to not be the rounded Steyr variation)
- Bolt shroud 8626
- Cocking piece 26
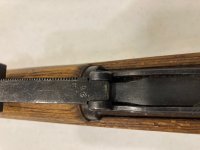
- Stamped Trigger-Guard WaA135 (capture-screw version, but the stock is not drilled for them)
- Stamped Floorplate byf
- Follower lxr
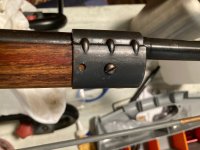
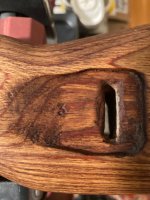
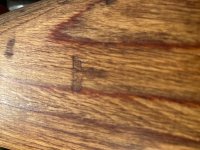
- KM Stock (metal nose-cap w/o rod-hole, laminated, red glue, matching hand guard, original finish w/ open grain, Eagle/H stamp)
- Blued (except maybe the rear barrel-band???)
 

Attachments

  • Barrel - Rear Left 2.jpg
    Barrel - Rear Left 2.jpg
    200.6 KB · Views: 118
  • Barrel - Rear Left.jpg
    Barrel - Rear Left.jpg
    193.3 KB · Views: 120
  • Barrel-Bands - Right.jpg
    Barrel-Bands - Right.jpg
    218 KB · Views: 113
  • Bolt - Rear.jpg
    Bolt - Rear.jpg
    183 KB · Views: 115
  • Bolt - Top 2.jpg
    Bolt - Top 2.jpg
    267.2 KB · Views: 115
  • Bolt - Top 3.jpg
    Bolt - Top 3.jpg
    215.7 KB · Views: 124
  • Bolt - Top 4.jpg
    Bolt - Top 4.jpg
    215.7 KB · Views: 120
  • Bolt - Top.jpg
    Bolt - Top.jpg
    189.6 KB · Views: 112
  • Bolt Root.jpg
    Bolt Root.jpg
    185.3 KB · Views: 123
  • Butt - RIght.jpg
    Butt - RIght.jpg
    288 KB · Views: 129
  • Front Band - Right.jpg
    Front Band - Right.jpg
    250 KB · Views: 124
  • Front-Sight & Muzzle.jpg
    Front-Sight & Muzzle.jpg
    188.9 KB · Views: 113
  • Nose-Cap.jpg
    Nose-Cap.jpg
    231.5 KB · Views: 107
  • Rear Band - Right.jpg
    Rear Band - Right.jpg
    301.9 KB · Views: 100
  • Rear Sight Right.jpg
    Rear Sight Right.jpg
    279.5 KB · Views: 114
Last edited:
Additional pics:
 

Attachments

  • Rear Sight.jpg
    Rear Sight.jpg
    218 KB · Views: 69
  • Rear-Sight Base.jpg
    Rear-Sight Base.jpg
    246.7 KB · Views: 64
  • Receiver - RIght.jpg
    Receiver - RIght.jpg
    223.7 KB · Views: 79
  • Receiver - Top 2.jpg
    Receiver - Top 2.jpg
    240.8 KB · Views: 79
  • Receiver - Top.jpg
    Receiver - Top.jpg
    191.6 KB · Views: 83
  • RIfle - Right.jpg
    RIfle - Right.jpg
    201.3 KB · Views: 75
  • Sling Cutout Stamp.jpg
    Sling Cutout Stamp.jpg
    320.4 KB · Views: 79
  • Stock-Stamp Closeup 2.jpg
    Stock-Stamp Closeup 2.jpg
    316.2 KB · Views: 79
  • Stock-Stamp Closeup.jpg
    Stock-Stamp Closeup.jpg
    378.9 KB · Views: 82
  • TG & Floorplate.jpg
    TG & Floorplate.jpg
    218.7 KB · Views: 79
Very typical q block, you did good - the q block is the hardest bnz45 coded rifle to get in my experience.

Thanks! I did a bunch of comparisons between this rifle and others on the forum before making the deal. Amazing how valuable the material here is! Appreciate the feedback and glad I didn't muck it up!

mos
 
The only negative here is the cleaned stock, but it doesn't look sanded which is good.
 
The only negative here is the cleaned stock, but it doesn't look sanded which is good.

Interesting... I wonder if its the flash from my camera, but it doesn't look at all cleaned to me.

I wiped it down gently with a clean and dry cotton rag (tight weave so as to not snag any wood fibers) and there are still lots of spots which appear to have grime on them.

Its definitely not sanded, and I honestly don't think it's been cleaned. What's the best way to take some more pictures to share so you can see what I see (not a skilled photographer)?
 
If you don't have a lighting setup for your camera, best to take photos outside in the shade or on a cloudy day.

Could be the photos, but it looks cleaned though. Dirt in the grain, color looks washed out, stock inspection looks a bit "fuzzy". It may have been lacquered at some point which was removed. That's often how they end up looking like this.

But it's not horrible or anything.
 
Cool rifle, Thanks for showing the waff. on the rear sight base/sleeve. It's rare for someone to do this. I'm always curious when the transition from E/77 to E/623 occurred on this part.
Since this waff. is rarely photographed I haven't gotten very far. If you ever take it apart, it'd be awesome to know the barrel code. (y) :)
 
  • Like
Reactions: mos
The front band screw looks much larger than the rear one, and looks more like a modern round head screw, did Steyr have any variation in woodscrews? Its finish is also different while the rear screw looks much more like both bands.
 
Cool rifle, Thanks for showing the waff. on the rear sight base/sleeve. It's rare for someone to do this. I'm always curious when the transition from E/77 to E/623 occurred on this part.
Since this waff. is rarely photographed I haven't gotten very far. If you ever take it apart, it'd be awesome to know the barrel code. (y) :)
I will definitely take it down fully at some point, and I'll post anything that's there!
 
It is cleaned, but don’t be too hard on yourself it’s a learning curve. You also found the single hardest block of 1945 Steyr production, there are very few Q blocks floating around and the attrition rate for major issues or being incomplete is very high.
 
The front band screw looks much larger than the rear one, and looks more like a modern round head screw, did Steyr have any variation in woodscrews? Its finish is also different while the rear screw looks much more like both bands.
I observed that too but assumed it was normal. No idea as to the answer to your question, but would also love to know!
 
Last edited:
I think you can safely assume that the screw is a replacement, but it's no big deal, Probably the easiest thing to do if it bothers you, is to just turn down the head to the proper size. Otherwise you'll have to dowel the oversize hole to install the correct sized screw, which also isn't a big deal if you're at all handy with tools. (y) :)
 
  • Like
Reactions: mos
I think you can safely assume that the screw is a replacement, but it's no big deal, Probably the easiest thing to do if it bothers you, is to just turn down the head to the proper size. Otherwise you'll have to dowel the oversize hole to install the correct sized screw, which also isn't a big deal if you're at all handy with tools. (y) :)
Well.... before I go mucking with anything I think I'll try to find any others out there with a similar screw in that location. Failing that... yeah... I guess I'll just turn it down.
 
This rifle belongs in the Picture Reference Index. If I knew how to do it I'd put it in there, but I believe only Mr. Farb can do it. o_O :cry:
 
  • Like
Reactions: mos
Nice and like others have said very early for ‘45 steyr! Front screw def not original but not a big deal as others have said. Most of the repros floating around are phosphate but if u can find one that’s easily fixed as well. Steyr used the same screws as MO and the rear is correct. Also it looks like the HG might be odd-lam? That’s a nice plus too and very early for these - I’ve only seen in S block. Also any chance of posting a pic of the loop side of the lower band?
 
Is the TG lock screw hole tapped or only drilled? That front action screw looks like it might be a replacement, the profile looks like a certain postwar screw to me, they have a slightly longer threaded portion of the shank as compared to a wartime 98k screw if so, also Steyr surface ground their screw heads instead of machining them, so they are easy to tell.
 

Military Rifle Journal
Back
Top