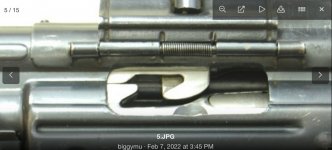
This has been a real learning experience. I started with a section of 8620 alloy. Used the specs of the drawings I have. got close. The main problems is the hooks on top and the groove for the ejector. So I milled off the hooks and made a new piece. Dovetailed it in. And made the ejector groove a bit deeper and higher.
I also found something that was not on the drawing. The rear of the bolt has to be a smaller diameter than the front. If not then the bolt will not drop down to lock up. Found that out the hard way. So I reduced the diameter of the rear end. I made the new hooks according to the drawing. Or so I thought.
The problem is that the height of the bolt has to fit into the window of the inside top of the receiver and the top of the trunnion. Also found that out the hard way. Once I had that corrected I slid the bolt and carrier into the receiver.
Well it wouldn't drop down. The carrier has to cam the bolt down by using that ramp on the bolt and carrier. So I gradually reduced the height of the hooks. After a lot of futzting around ( that's a Pa. Dutch term) I finally got the bolt to lock down. Then I had another problem. I need to add a bit of metal to the bottom of the hooks. As the bolt goes back those hooks on the carrier engage the hooks on the bolt to lift the bolt up out of lock up.
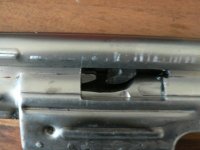
But now I have the carrier and bolt sliding in and locking up. And when in battery the bolt doesn't lift up. When the mag is in place it puts pressure on the bottom of the bolt. Found that out the hard way too.
Now if you put the bolt and carrier in the receiver and tilt the front of it down, the unit slides down and locks into battery. Happy Days.
I ran an aluminum rod down the muzzle to see if I could push the bolt back. Nope. But if you really jerk on the charging handle the whole unit comes back.
Also when locked down without the return spring in there is no back paly in the bolt. I'm tight up against the locking shoulder.
I had tried to remove the ejector for a test. No dice. That thing is in there.
So for now, I'm going to add a bit of metal to the bottom of the hooks. They won't look so skinny then. Then I weld the hooks to the bolt. And then fit until everything is fine.
Then I finish with the extractor and firing pin. I'm going to use this bolt as test bolt. Once everything works as it should then I'll make new bolt using this one as a pattern.
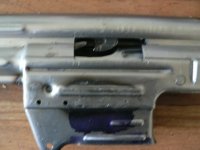
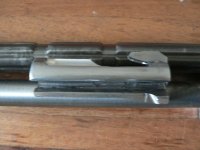
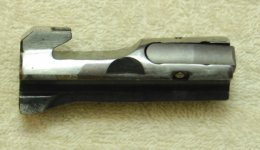
So here it is so far as it is made. In the one picture you can see one of my oops! moments at the ejector port. My measuring foo was off slightly. BTW those 2 little holes are for the ejector pins that I took out. I have to put them back in.
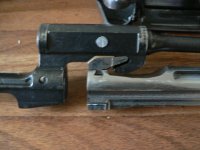
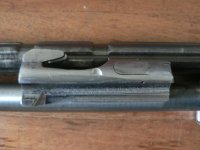
Oops the first pic is a bit fuzzy. But the bolt is locked down and in battery. Also I know that the carrier is up against the bolt. The back of the anvil in the carrier sticks out and won't go forward. Which tells me that the carrier is up against the rear of the bolt.
I also found something that was not on the drawing. The rear of the bolt has to be a smaller diameter than the front. If not then the bolt will not drop down to lock up. Found that out the hard way. So I reduced the diameter of the rear end. I made the new hooks according to the drawing. Or so I thought.
The problem is that the height of the bolt has to fit into the window of the inside top of the receiver and the top of the trunnion. Also found that out the hard way. Once I had that corrected I slid the bolt and carrier into the receiver.
Well it wouldn't drop down. The carrier has to cam the bolt down by using that ramp on the bolt and carrier. So I gradually reduced the height of the hooks. After a lot of futzting around ( that's a Pa. Dutch term) I finally got the bolt to lock down. Then I had another problem. I need to add a bit of metal to the bottom of the hooks. As the bolt goes back those hooks on the carrier engage the hooks on the bolt to lift the bolt up out of lock up.
But now I have the carrier and bolt sliding in and locking up. And when in battery the bolt doesn't lift up. When the mag is in place it puts pressure on the bottom of the bolt. Found that out the hard way too.
Now if you put the bolt and carrier in the receiver and tilt the front of it down, the unit slides down and locks into battery. Happy Days.
I ran an aluminum rod down the muzzle to see if I could push the bolt back. Nope. But if you really jerk on the charging handle the whole unit comes back.
Also when locked down without the return spring in there is no back paly in the bolt. I'm tight up against the locking shoulder.
I had tried to remove the ejector for a test. No dice. That thing is in there.
So for now, I'm going to add a bit of metal to the bottom of the hooks. They won't look so skinny then. Then I weld the hooks to the bolt. And then fit until everything is fine.
Then I finish with the extractor and firing pin. I'm going to use this bolt as test bolt. Once everything works as it should then I'll make new bolt using this one as a pattern.
So here it is so far as it is made. In the one picture you can see one of my oops! moments at the ejector port. My measuring foo was off slightly. BTW those 2 little holes are for the ejector pins that I took out. I have to put them back in.
Oops the first pic is a bit fuzzy. But the bolt is locked down and in battery. Also I know that the carrier is up against the bolt. The back of the anvil in the carrier sticks out and won't go forward. Which tells me that the carrier is up against the rear of the bolt.