BYF 43, Grandpa’s gun

45Smashemflat

Active member
Good evening, newby here…

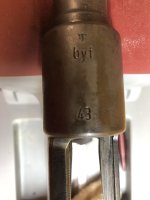
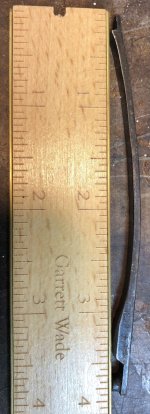
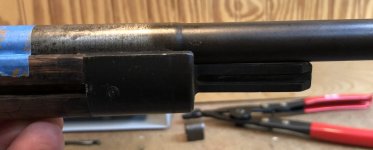
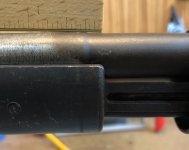
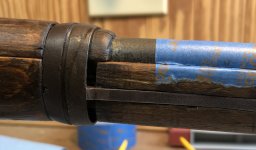
Inherited this Mauser from my Grandad many years ago. I had hunted with it as a kid and it had this “electrical tape repair“ even back then. I finally decided to dig in to this and see what the deal is. Turns out it was hiding a duffle cut. (Which explains why it had no cleaning rod, there was a dowel in the rod hole as a “support.” It appears to be a numbers matching rifle. (1601). All parts and the stock and hand guard are marked 1601 or 01.

It is missing the cleaning rod, front band spring, and the two small locking screws for the milled floor plate.

As it is a family piece, and not for sale, I plan to follow the duffle cut repair technique shared here. Any tips on locating the couple of missing parts I need would be greatly appreciated. If there are other tips, info regarding the rifle, I’m all ears!
 

Attachments

  • IMG_9137.jpeg
    IMG_9137.jpeg
    163.1 KB · Views: 257
  • IMG_9166.jpeg
    IMG_9166.jpeg
    243.2 KB · Views: 256
  • IMG_9095.jpeg
    IMG_9095.jpeg
    249 KB · Views: 257
Thanks for the tips, and rod offer. Any other suggestions on parts suppliers? The screws look to be tricky, most have cut outs.
 
One stock question. I don’t plan to “refinish” the stock, but it does have the residue of 60-70 years of that electrical tape. Any tips on cleaning it up? I’m sure a solvent will get the “goo” off, but then what about the finish under that? What was used to finish these? The area inside the stock are quite shiny.
 
Larry Eisel sells very nice original cleaning rods on eBay for $29. Also, Just search K98 capture screws and K98 band spring on eBay for those and you're golden. I keep a few spare sets handy.
As for repairing the duffel cut, you can find brass tubing at most hobby shops (Hobby Lobby for sure). You need the next size up from the diameter of an original cleaning rod, so get your cleaning rod first.
Slightly enlarge the cleaning rod holes on the two inside (not the outer hole at the end of the stock) just enough that the brass tube will fit.
This will serve to align the the two ends and the cleaning rod will still fit through it.
Drill and inset two wooden dowels (one each side) inside the cut area (you'll drill 4 holes maybe 3/4 inch deep each). You will use wood glue (carpenter's glue) here later to
secure. Put it all together with out glue and use the band spring installed to determine the exact location the fore-end will been be glued into (there will an approx 1/8 gap in the stock
where it was cut from the wood removed during the cut). After determining the exact location the fore-end needs to be you simply disassemble it, glue those dowels (all four points),
and re-assemble with the brass tube in place (inset the cleaning rod too), and you leave the gap in the stock, which will be hidden by the rear band when all has dried and solid.
You "can" use filler for that gap after it is all set but I just leave it. The filler doesn't make it any more solid and I see no reason to hide it since the band covers it anyway.

You know, I will gladly send you a repro cleaning rod (12.5 inch), a couple capture screws, and a band spring if you want just because it's Christmas and I like paying it forward on occasion.
Heck, I probably even have enough brass tubing you could use. Just shoot me a message and they're yours at no cost.
 
One stock question. I don’t plan to “refinish” the stock, but it does have the residue of 60-70 years of that electrical tape. Any tips on cleaning it up? I’m sure a solvent will get the “goo” off, but then what about the finish under that? What was used to finish these? The area inside the stock are quite shiny.
I used denatured alcohol to clean some kind of lacquer/shellac from my first K98k when I first picked it up. It works great, and is not harmful to the factory finish either.

Here's a link to the thread with the advice I received on cleaning it.

 
I used denatured alcohol to clean some kind of lacquer/shellac from my first K98k when I first picked it up. It works great, and is not harmful to the factory finish either.

Here's a link to the thread with the advice I received on cleaning it.


Thanks! After you got the shellac off, did you go back with anything?
 
Good afternoon! Getting started on some dry fitting of this duffle cut repair and ran into a puzzle. (Quick shout out to Joseph Burke for gifting me the needed parts!!)

The milled band spring looks like it might be a little long. Were there different lengths?
 

Attachments

  • IMG_9269.jpeg
    IMG_9269.jpeg
    207.8 KB · Views: 23
Expanding on this, I fry fit it together with the spring installed as I think it goes. I marked the barrel and loose formed for re-alignment without the spring and to the following photos. The duffle cut is certainly not square, but the ends do match, and the resulting gap looks too large to me. Also note there the front band, as well as the bayonet lug end up relative to the first shoulder of the barrel. Now, I really am a noob here, but that does not look right to me. Any insights? Do I need a different band spring, or should I grind on this one to make it a tad shorter?
 

Attachments

  • IMG_9262.jpeg
    IMG_9262.jpeg
    153.2 KB · Views: 39
  • IMG_9267.jpeg
    IMG_9267.jpeg
    149.7 KB · Views: 39
  • IMG_9268.jpeg
    IMG_9268.jpeg
    122.5 KB · Views: 39
Good afternoon! Getting started on some dry fitting of this duffle cut repair and ran into a puzzle. (Quick shout out to Joseph Burke for gifting me the needed parts!!)

The milled band spring looks like it might be a little long. Were there different lengths?
I’m guessing the reason you think the band spring is a little long, is because when one seeks to repair a duffle cut, allowances for the saw kerf were not made.
Hope you didn’t glue up the stock and THEN made this assumption that the spring is too long!
I use the band spring to gage the saw kerf and glue the stock accordingly.
 
Nope nope, just fry fitting now. What has me wondering is that the band spring is longer than the 3 5/8” that Numrich calls out in their parts list. This one is 3 7/8”. Also, when dry fit, the gap between the pieces is 5/16”. Way thicker than any saw kerf I know. But if I account for 1/4” difference between actual and the Numrich spring length, I’d land on a 1/16” kerf, which seems reasonable.
 
Ok, here a few more photos of my dry fit.

With the spring latched in to the rear and front band, I end up with a gap larger than the rear band.

With it installed that way, the front band is 3 5/8” from the front sight base.

The bayonet iron is proud of the first shoulder of the barrel by 1/4”

Any chance someone could confirm these benchmarks are about right and I just have a really wide kerf/gap in the duffle cut? Or is it possible this spring is 1/4” or so long?

Note, the spring is NOT original to the rifle.
 

Attachments

  • IMG_9282.jpeg
    IMG_9282.jpeg
    146.1 KB · Views: 27
  • IMG_9283.jpeg
    IMG_9283.jpeg
    160.3 KB · Views: 26
  • IMG_9285.jpeg
    IMG_9285.jpeg
    216.3 KB · Views: 28
  • IMG_9284.jpeg
    IMG_9284.jpeg
    205.1 KB · Views: 28
That spring looks too long. Your 3rd picture shows what you suspect. The bayonet lug is @1/4” too far forward. Must be the wrong spring.
 
the spring for a Spanish M43 is a bit longer, because the sling band is narrower. Some versions of Israeli K98k had a narrow rear band, hence a longer spring, perhaps yours is one of those?
 
Back
Top