Waffenfabrik Mauser Oberndorf Gew 71/84 - 657A (restoration project)

Cyrano4747

Well-known member
Here is something I didn't expect to have in my collection for a very, very long time.

A while ago I spotted a Gunbroker auction for two salvage-grade Gew71/84s. Here is the listing photo:

pix946420895.jpg
I've been idly looking at all sorts of trash 71/84's for a while in the vain hope that I might spot an Oberndorf in need of some love, and that day I hit the jackpot. The one with no wood was an Oberndorf.

pix554011211.jpg

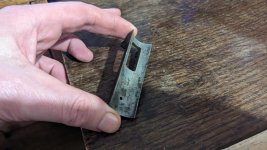
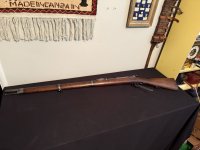
Even more happily it wasn't in near as bad shape as the rust bucket Amberg that came along for the ride. The general condition when I got my hands on it was filthy, but very little actual rust. Here are a couple of shots that should give you a feel for the general shape.

IMG_4448.JPG

I wish I had taken a picture of the inside of the receiver before I removed the lifter arm, it was caked full of some really foul dirt or mud or something, and fragments of what appeared to be old paper. I feared the worst, but it wasn't locked up.

IMG_4446.JPG

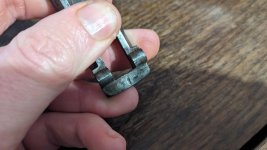
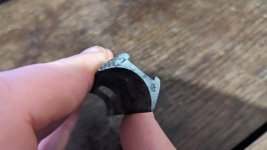
The lifter arm and part of the trigger assembly after sitting in a jar of mineral spirits for a week. Happily the crud you see still on there scraped off easily with a custom made brass scraping tool (aka a cartridge flattened on an anvil) with no major pitting.

IMG_4523.JPGIMG_4526.JPG

The gun is obviously incomplete. The front sight and the rear sight ladder were both missing (although the flip up v-notch, rear sight pin, and spring were all present), the stock and all of its hardware are obviously distant memories, and the magazine tube, follower, and spring are also MIA. On the up side the trigger guard, magazine components (spoon, selector, etc), trigger, and all the associated small parts were there and matching.

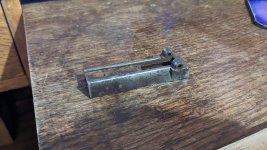
The really ugly part is that the under-barrel lug that locks the magazine tube and front barrel band in place was removed:

IMG_4572.JPG

I did a test fitting with a stock and magazine I pulled off a shooter Spandau. The good news is that if you're just setting up for something to look right you can still install the magazine and stock without that lug, but it still bugs me. I've got a fix in the works for this that I'll detail once I get it fully worked out.

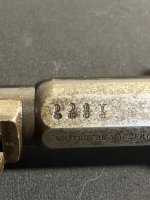
Based on that and the extreme bluing wear to the underside of the front of the barrel (where it would normally be covered by the stock) I believe this gun was sporterized at some point, likely when these were being imported as cheap surplus by the likes of Bannerman:

IMG_4571.JPG

I've completely torn down the rifle and given it an extremely thorough detail cleaning. I'll post up some pics of the gun as it is now and the various markings on it in a bit. I've already replaced some parts (the front and rear sight) with bits salvaged from the junker Amberg up above, and I have everything else I need to put this gun right on order. Well, "right" in the appropriate number of scare quotes. Obviously I'm never getting correct Waffenfabrik Mauser parts, these things are exceedingly rare as it is. But I'll complete it and put it back into military trim at the very least.

Doing the math on the replacement parts, some materials I've needed to fix bits that needed repair, and the cost of the gun itself I figure that when it's all said and done I'll be into this to the tune of about $800, maybe $850. Not bad to finally get an Oberndorf 71/84, even if it's not a complete, matching example.

I'll update in a moment with details on the markings, small parts, etc. as well as the work I've done so far.
 
First off, markings and assorted other collector stuff. This is all after a thorough cleaning. If there are any specific markings that anyone is interested in just ask, I took pretty detailed pictures of everything.

Roll mark, acceptance, and inspector stamps:

IMG_4556.JPG
IMG_4555.JPG

I.G. Mod 71/84

IMG_4539.JPG

1887 dated

IMG_4552.JPG

Wurttemberg acceptance stamp:

IMG_4563.JPG

The gun itself cleaned up well. Here is an interior shot of the receiver to compare to the gross dirt/oil/rust caked mess I posted above. It looks shiny because of all the oil it's been bathing in for the last few weeks.

IMG_4542.JPG

Trigger group, all matching.

IMG_4636.JPG
IMG_4640.JPG

Lifter spoon and the selector block, also matching (the spoon is fun to compare to the mess I posted above):

IMG_4655.JPGIMG_4657.JPG

Detail on the selector spring and its screw. This screw came to me a bit buggered but you can still make out the SN.

IMG_4675.JPG

Everything reassembled:

IMG_4685.JPG

IMG_4686.JPG

Finally the receiver insert. This is kind of interesting, as the SN on this matches the SN on the rifle. It might indicate Mauser had a different process than what you see at the bigger arsenals.

IMG_4547.JPG
 

Attachments

  • IMG_4555.JPG
    IMG_4555.JPG
    176.2 KB · Views: 2
Last edited:
Now on to repairs and replacements.

The bonus Amberg that came in the auction is pretty worthless - it is an absolute wreck of a rust bucket, and the magazine tube is rusted through and fused with what remains of the stock so that wasn't salvageable. Try as I might I can't even get the front action screw out, it is frozen shockingly tight to the point that I think I might have to cut the head off to salvage the trigger guard and the various small parts.

However, it did have complete sights.

The front sight was simple enough. Smack it with a brass punch a few times, pop it out, clean it up, and drift it into the Oberndorf.

IMG_4584.JPG

Zero drama, I didn't even need to heat the front base. As a bonus once cleaned the wear on the front sight blade is fairly close to the condition of the gun it lives on now.

The rear sight, however, was a bit of a different story. Mostly because it was badly bent, to the point that it would not sit flat on the gun. Here it is in the auction photos:

pix402133123.jpg

Worse, and harder to see, it was also bent inward from the side such that the two legs of the ladder were no longer parallel to each other.

There is no gentle way to fix this. After removing the sight and giving it enough of a cleaning that my hands weren't coming away rust colored I broke out the blow torch, heated the trouble spots, and started whacking on the anvil.

Once I got it this far I was able to get the slider off:

IMG_4436.JPG

After a bit more percussive maintenance:

IMG_4439.JPG

Not half bad. I was also able to wedge a piece of scrap brass in there enough to give me a surface to try and pop the bent leg out from the side, and by the end of the day I could move the slider freely up and down it.

After that it was just a lot of detail work with brass brushes and elbow grease.

I was very happy to find that once cleaned up the rear sight also matched the general state of wear on the Oberndorf. It isn't perfect, but it looks pretty good. The rear sights are one of the more expensive components to source, so I was very happy that I could salvage this one.

Here it is installed in its new home:

IMG_4612.JPG

On to the next major issue: the rear action screw. It was extremely stuck, to the point that during my initial disassembly I had to very carefully remove the trigger while the trigger guard was still in place so that I could remove the front action screw and rotate the trigger guard 90 degrees to let up some tension. The problems were two fold:

1) the TG itself had a nasty bend in it that effectively shortened it by probably 1 mm or so:

IMG_4687.JPG

2) the action screw was bent near the head:

IMG_4399.JPG

Well that's no good.

First thing's first, the trigger guard. This was simple enough, if nerve wracking. Heat the bent part with a blow torch, whack it on the anvil a bunch with a very lightly padded hammer (single strip of leather just to avoid hammer marks), and then compare it to one I pulled off the same shooter Spandau I used to examine the mag tube/stock interface. Repeat until the bends that shouldn't be there were gone, and the angles looked right.

Results:

IMG_4691.JPG

That's better. Not perfect, but good enough that I didn't want to push things. Some test fitting with the Spandau stock showed it would go in, albiet as a tight fit. Since all these things were hand fit to each other in the first place I'm pretty happy with that result.

A view from above, showing the SN. If you look closely you can see where I screwed up and cooked the metal a bit, causing a slight bit of discoloration. I'm not thrilled with that, but buffing the area with some bronze wool took it down considerably and looking at it a few days later it generally fades into the over-all patina and wear on the metal. I can see it because I know it's there, but it's not so unsightly that it's obvious at a glance. I was afraid that might happen and probably got a little over-zealous with the heat, but on the other hand I REALLY didn't want to crack that TG.

IMG_4692.JPG

On to the screw.

This one really sucked. There is no good way to re-bend a bent screw like that. I tried lightly padding it and putting it in the vice to see if I could just squish it straight, but no dice. In the end I found a scrap door hinge with screw holes that almost perfectly matched the diameter of the action screw's shaft, slipped that into the vice, tapped the head of the screw as flush to it as I could, heated the whole mess as hot as I dared, and used a metal pipe as a cheater bar to very, VERY carefully reverse the bend.

IMG_4419.JPG

The good news: the screw is straight and I didn't shear the head off which is what I was most afraid of.
The bad news: the screw cracked, as you can see in this photo:

IMG_4420.JPG

With those cracks I wouldn't trust this to hold anything secure, however I can get it to hold the TG against the action with it thumb-tight. In other words, good enough for display, which the screw wasn't before. I'm not happy with this result, but it's better than throwing the bent screw in a baggy and rubber banding it to the gun.


After all of that, here is the current status of the rifle. All the parts that came with it have been cleaned and fixed such that they fit together properly again. TG installed, action screw holding it properly in place. Replacement sights from the Amberg installed. You'll also notice a sling swivel is on the TG now. That also came off the Amberg.

IMG_4755.JPG

IMG_4756.JPG

Now to wait on the replacement stock, bolt, mag tube, and assorted stock fixtures.
 
Very nice work! The rifle could also have come from Ye Olde Hunter in the 1950’s. I bought two on a one cent sale,, $9.99 for the first and another for 1 cent, shipped Railway Express to a 13 year old. Needless to say the second one looked a lot like yours!
 
What a worthy restoration-- these WMO 71/84s are few and far between.. Glad it went to someone who would appreciate what it is regardless of how completed was.
 
Love rescue jobs like this great work mate. Restored a homeless 71/84 barreled action in the past myself. Your job was way tougher so hats off to you. The hardest part I found was locating a mag tube and cartridge lifter, but they do come up. Try something ' bay.com .....

Very inspiring, in fact I am looking for a new project after seeing this !

Edit, I found this in my spares box , do you need this ?
 

Attachments

  • PXL_20250504_224058221.jpg
    PXL_20250504_224058221.jpg
    274.2 KB · Views: 7
  • PXL_20250504_224103088.jpg
    PXL_20250504_224103088.jpg
    252.4 KB · Views: 7
  • PXL_20250504_224114023.jpg
    PXL_20250504_224114023.jpg
    164.8 KB · Views: 7
  • PXL_20250504_224123291.jpg
    PXL_20250504_224123291.jpg
    131.4 KB · Views: 7
Last edited:
Here's a fun update: It's done.

I'm going to break this into a couple of posts with this one just being the update to the gun itself than a few on some of the things I needed to do to get it into this shape.

First off, big thanks to Meyers Arms, aka @Fal Grunt . He had a 71/84 stock set that was able to round out most of the parts I needed in one stop, and at a very fair price - stock, mag tube, bands, etc. I also grabbed a complete bolt off him. I'm not going to go too much into those parts since they're not original to the gun, but suffice it to say they're in very good condition and compliment the over-all wear of the original parts well.

IMG_5259(1).JPG

Here's the rifle sitting in the stock.

IMG_5260(1).JPG

And the completed gun. Apologies for the dirty table, I didn't pack up the throw cloth I use for pics before doing some work and need to wash it.

IMG_5258(1).JPG

One thing I will note is that there is a slight gap where the front band butts up against the stock. I'll get into why this is in a future post where I detail how I repaired the missing barrel lug and what, exactly ,it does in this model rifle, but I will note that the gap I've got while large is no worse than some examples I've seen of matching guns. Long story short the band/pin/stock system is not a super precise fit, likely to aid in manufacture. If you've ever wondered why matching guns can have this gap it's not wood shrinkage but just how they were built. I suspect they were like that leaving the factory.

Anyways, I'd have preferred to fit it a little bit better and if I had it to do over again (which I never will, lol) I'd change a few things, but it's acceptable.

IMG_5264(1).JPG

As a preface to discussion of the repairs I'll say that there were two major areas that needed addressing: The stock needed some minor fitting, which isn't unexpected given the era these were manufactured in and the fact that the barreled receiver and stock are from different factories. Looking at this side by side with a Spandau, for example, I'm pretty sure there are slight but significant differences in tang shape.

The second, of course, is the under-barrel lug that was filed off when this was made into a sporter. That was a much more complex problem to tackle and I'll talk about in a separate post.

The problem with the stock was that the rear action screw would not go through. With the action in the stock putting the screw in was an extremely tight fit, to the point that a mallet needed to be used, and when it reached the trigger guard it would not thread in and needed to be driven out with a punch. After marking the screw up with some sharpie to spot where it was rubbing in the stock it was pretty apparent that it was being forced in at a slight angle. I believe this is due to the tang on the Oberndorf receiver being slightly different in over-all shape, and conflicting with the hole that was drilled for the shape used by whatever factory made the rifle this stock was off. It was severe enough that the lip of the screw head would actually catch on the edge of the tang slightly.

IMG_4808.JPG

If you look closely at the above picture you can see that the screw body is being pushed pretty hard up against the forward edge of the hole (NW in the direction of the photo).

The solution was to carefully file the inside of the bushing that is pressed into the stock for the action screw and relieve the pressure points. Thankfully not much was needed. It was a lot of slow work with a lot of test fitting, but eventually I got things to where the screw could be pushed in by hand and it would screw into the trigger guard. The whole system is still a bit tight and because of this I don't think I'll ever use the original (cracked) Oberndorf action screw, which is disappointing. The screw will, of course, be kept with the gun.

You can see in this pic where I thinned out the wall of the bushing.

IMG_4809.JPG
 

Attachments

  • IMG_5263(1).JPG
    IMG_5263(1).JPG
    140.5 KB · Views: 1
Now on to the barrel lug. First off, a few notes on how all of this works on the Gew 71/84, because I learned a lot trying to puzzle out a fix to this.

The lug serves a few purposes. As we all know, there is a flat cross pin that goes through the front band, the stock, and between the horizontal cuts on the lug.

IMG_4736.JPG

(these pics are from a Spandau I took apart to examine)

This obviously holds the front band in place and helps secure the front of the barrel. What wasn’t as immediately apparent to me, however, was how it interacted with the magazine and the matching lug on that.

With the mag tube in and the barreled receiver removed, however, you can see that the lug on the magazine butts against the reverse face of the pin when assembled. The two lugs from the barrel then sit across both. This does two things for the mag tube: It prevents it from sliding forward under recoil and it locks it from rotating.
IMG_4857.JPG

Something I’ll note, however, is that the while the slot for the cross pin in the front band is a very precise fit to the pin, the corresponding slot in the wood is notably larger in length, but not height. I’d estimate about 1-2mm of difference. This is what is responsible for there being some variation in how proud the front band sits on the end of the rifle. I’m not sure why, exactly, it was designed this way but my initial guesses are to compensate for variation in the size of the lug on the magazine or because it was more difficult to make precise, small cuts in that area of the stock, or perhaps to avoid a little bit of very fine hand fitting. Either way, this explains why some guns have that gap between the front band and the stock. I’ll also note that the slot in the band is squared off, while the slot in the stock has rounded ends – it could be an artifact of how they cut the slot in the stock and not wanting to introduce a stress point that could fracture the stock along the slot. My other thought is that it might be an allowance for slight variations in the position of the lug on the bottom of the barrel.

There are a lot of tolerances there that could stack badly, so it make sense they might have designed this as a place for them to shake out. That’s all conjecture, but it’s hard to avoid these kinds of thoughts when you get this deep into figuring out how these parts match together.

With all that said, here is my problem:

IMG_5134.JPG

That is obviously not an in-spec barrel lug. Happily, though, there was still enough of a ghost to see exactly where it once sat.

The first step was to figure out a way to replace it. I considered a few options, but at the end of the day I wanted something that would 1) be obvious at a glance as a repair to anyone who handles this gun in the future and 2) could be reversed without causing harm to the rifle if necessary. I was also constrained by the tools at my disposal, namely a suburban tinkerer’s garage without mills, lathes, or other equipment needed for serious machining.

With those considerations in mind I settled on trying to cobble a replacement out of brass. It’s soft enough to work with hand tools and the (bad) gunsmith’s favorite friend Mr. Dremel.

IMG_4699.JPG

After measuring the lugs on another rifle I roughed out the general dimensions with a sharpie, leaving a bit of extra meat for fitting, and zipped out the basic shape with the Dremel.

IMG_4700.JPG

IMG_4701.JPG

With that done I used a hand file to cut things down to match the critical dimensions. First the width of the channel in the stock and the matching lug on the mag tube :

IMG_4852.JPG

Then the channel for the pin:

IMG_4734.JPG

IMG_4860.JPG

With that basically roughed out, the next step was to thin the brass a lot so the magazine and barrel could fit in. My general plan was to thin it was much as possible on the barrel side, secure it, and then do final fitting with it in place.

What followed was a lot of filing. A LOT of filing. I also thinned down the “prongs” of the lugs a bit to rough in the general depth needed to let the magazine tube clear.

IMG_4863.JPG

Once I got it thinned enough that I was afraid of breaking through and wrecking it I used the barrel itself as a mandrel and gently hammered the brass to at least somewhat fit the curve of the barrel. This was the result:

IMG_5131.JPG
 
At this point I took a bit of a break to try and figure out how to attach this. The proper way probably would have been to braise it, but I’m working with the limitations of my tools and a desire to not do anything permanent. After trying a few different things that I already knew were fine on metal (mostly threadlockers that inevitably sheared off with such a large surface) I settled on a two part epoxy. I tested it on a piece of similar age scrap steel I had lying around (damaged Gew71 trigger guard) and left that in the humidity of my garage for a week to make sure that A) it wouldn’t promote rust or anything else unfortunate and b) that I could get it off later if I needed to. The epoxy came off fine with a brass scraping tool and didn’t leave behind any permanent marks, so off we go.

A bit of glue and a few days of curing later:

IMG_5222(1).JPG

Now for the fun part, and finding out exactly where the critical dimensions on all of this mess are.

First off, since I was going to have to file with this in place I put a double layer of masking tape on the steel near the work area. You will see that in a few pictures and it saved my butt more than once and helped avoid marks on the gun itself.

I won’t bore with the details of every little dimension I had to double check, but the fit of the mag tube is a good example. As it sat on the gun, the lug prevented it from sliding into place properly:

IMG_5238(1).JPG

A little filing later:

IMG_5239(1).JPG

Much better.

The big issue I found was that the added thickness that the epoxy added prevented both the lug on the mag tube and the cross pin from sitting deep enough. Here you can see how the pin was riding over the brass and not engaging the opposite hole:

IMG_5234(1).JPG

After just way too much filing this is what I ended up with. Take note of how thin the brass in the middle is. You can see that tattered edges of where I was actually filing into epoxy, both in the middle and on the far left edge. If I knocked this off I have no doubt it would immediately break in half, as that material in the middle is foil-thin now and it’s essentially just held together by the epoxy. A few more touch ups to the inner radius of the lugs to make sure the mag tube cleared them and it all went together exactly as it should.

All in all, I’m satisfied with it.

IMG_5249(1).JPG

Final thoughts:

1) this was a god awful ton of work. It was a fun project, but understand what you’re getting into. I’d estimate I put a solid 25 hours of work into it all told, with at least 15 of that being the final hand fitting once the brass was attached to the barrel. Lots of going slow, putting things together, finding where stuff wasn’t fitting, taking it apart, filing a small amount, reassembling, etc.

2) this would have been a lot easier with better tools. Even a super basic benchtop milling setup would have made roughing out the part a lot faster and likely more precise.

3) If I had it to do again I think I would start by fitting a piece of the barstock to match the radius of the barrel for a finer fit, and then using that as the base to make the lugs. Again, easier with proper tools, but even if I was doing it with hand tools again that’s where I’d start.

4) this is absolutely not a project worth doing on your run of the mill sporter. Since I started this I’ve seen half a dozen similar guns that stood out to me because I’m aware of it, and not one would have been worth bothering with. It would have to be something really uncommon like another cut up MWO. Maybe a Danzig? Dunno how uncommon those really are. Certainly not a Spandau or Amberg unless there was some very compelling reason to need to restore that specific rifle.
 
I appreciate the thorough pictures and analysis as always! This was one of those guns that you just need to save. Personally, I think you did a great job considering how much was missing.

Thank you for not simply passing over it because it would have been too difficult of a project.
 
I appreciate the thorough pictures and analysis as always! This was one of those guns that you just need to save. Personally, I think you did a great job considering how much was missing.

Thank you for not simply passing over it because it would have been too difficult of a project.
Thanks. This was one of those oddball cases where I did want to document it somewhat just because I don't think information about this particular fix is anywhere on the internet. Not that this is a fix that anyone should ever do, unless they come across another semi-sportered MWO.

As for this being too much of a project, the price was right and MWO 71/84's don't exactly grow on trees. I've got to be honest, if it was just a barrel stub with the roll mark I probably would have thrown a few bucks at it just to have a paper weight. But happily it wasn't too butchered.

I got lucky with the junk amberg it came with having sights I could re-purpose. That saved me a few hundred bucks. But beyond that it was always a question of money rather than finding anything truly rare. 71/84 stocks, mag tubes, etc aren't dirt common but they're out there if you look. People on this forum being as helpful as they are I got a few PMs with links to ongoing auctions while I was working on all this.
 
Yes, this was worthy of saving, - early anything WMO is worth the effort, though the most impressive part is your resourcefulness and resolve, truly amazing how far you took this.
 
Back
Top