Semi MP-44 build

trenches

Active member
I'm in the process of building a semi MP-44. Always wanted one but could never afford one. Considered using a Cetme but decided not to. Then Dingo brought the flats in. I couldn't hit the buy button fast enough. So that was the start of the build.
I gradually bought some parts. Others I made or will make.
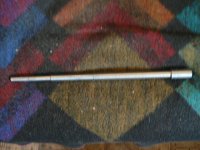
Bought a GM 8mm barrel blank and a Manson 7.92x33mm reamer and gauges.
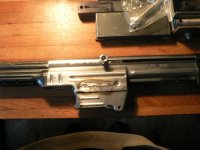
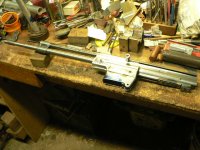
Then made a bending jig. After I bent the flat so far I realized I couldn't get the trunnion in. At the time I wasn't aware that the Germans stuck the trunnion in and then completed bending it. Once I opened up the flat the trunnion was put back in and then the flat completely closed up. And then welded where needed.
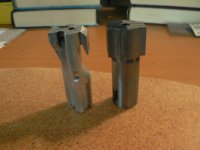
Previously KSH67 lent me some original parts. Particularly the bolt. So I used that and drawings to make a bolt from AL. I tested it in the flat with the carrier in and a trial barrel. It worked. The real bolt will be made out of 8620 alloy and case hardened.
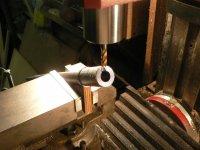
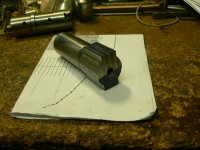
I just finished profiling the already chambered barrel. I used the drawing specs but used the ID's of the trunnion , gas block, and front sight to get those journal dimensions.
So now the barrel is done except for that feed ramp in the breech and the gas port hole. The spec for the hole is .150". Which seems a bit large .
I intend to make the grip stick. Which should be fun. And I will make the fcg parts based on Mauser's simplified design of 1944.
I had talked to shortfal about a year ago about this build. He gave me very good advice. Thank's shortfal.
I'll post a picture of the receiver which is quite finished yet. Forgive some of the crappy welds. Some days they are great and other days not so much.
 

Attachments

  • P1020492.JPG
    P1020492.JPG
    85.4 KB · Views: 98
  • P1020493.JPG
    P1020493.JPG
    83.5 KB · Views: 95
Glad to see you brought this over here! I've been following along over on WG. I wish you the best of luck with this project. I just recently got one of Dingo's kits for myself.
 
Thank you for Bringing this here Trenches. you have definitely been very helpful and informative on the other page.
 
Yes nice to see how you overcome issues with parts. Barrel and bolt. Sounds like tou are good to go on your project. Pics when done.
 
bending those flats is no joke, well done.
I'm glad I did all my MP44's when original parts were a LOT cheaper and more available.
Why not use one of DK's grip sticks?
Regardless great work!
 
Thanks for the replies guys. As to the grip stick, the problem is as usual, money. Just can't spare the funds for one. So I'll make one. Same goes for the bolt.
I forget the twist rate for the barrel. Should be ok. Shortfal used a Mauser barrel so I think I'll be good with this one.
One thing I did notice with the bought parts. The pilot hole in the front site is too close to the bore. Real close. So I'm going to weld that hole up and start a new one a bit higher up.
Putting the feed ramp is going to be a bit hairy. The AL one went great. But with the real one, I hope Murphy stays away.
I also made a mock barrel. Used that for some locations. I put the carrier and bolt in the receiver and then put the butt stock and spring in. Pulling back on the charging handle the unit worked great. No binding and the bolt unlocked. That spring sure has some power behind it. It's an original I got from RTG parts.
I'm going to use a modified Toth tool I made to do the barrel pressing. That gadget worked great with the 6.5 Grendel AK I built. So it should work with the MP-44.
Hopefully I'll get to the barrel install this weekend. Some work needs to be done to the receiver yet. Mainly welding up the locating hole in the front of the receiver. And temporarily attaching the sight tower.
 
The barrel is pressed in and the gas block and front sight is on. Nothing pinned yet. The gas port hole was located and drilled before installing the gas block. Everything lines up. Even the front sight.
However I now have a feeding problem. I think the mag is sitting a bit low. The left round sort of feeds into the chamber but the right one doesn't. I made that feed ramp in the breech to the specs on the drawing. I used the AL bolt to push the rounds in. I think one problem is that I don't have the bolt face recessed. So I'm not getting the correct angle for the round to feed up. I'll take care of that in due time. Also AL is sticky not slick like steel. So the rim could be dragging on the bolt face also.
In any case the carrier slides back and forth with no binding. So that's ok.
Don't ask about head spacing yet.. I have a plan for that process.
But right now I have to fix the feeding problem.
The problem with this build is that there isn't thousands of guys building one like they do AK's. So any info is hard to find. Plus who has bent up one of Dingo's flats to build one yet.
In a way I'm doing this by the seat of my pants. I'll get it feeding. It will just take a little fooling around with it. Nothing new for me. Had a lot of fun with a .32 ACP MP-18 before I had it feeding.
 

Attachments

  • P1020495.JPG
    P1020495.JPG
    83.2 KB · Views: 57
  • P1020496.JPG
    P1020496.JPG
    81.8 KB · Views: 57
I should add that the op-rod, gas tube, ejector, and return spring are all WWII German. I bought them from RTG parts. At least he said they were. The op-rod does have a waffenamt on it and "H".
RTG has some MP-44 parts. Good outfit to deal with. The butt stock came from Numrich. Who made it is anybody's guess. Nice stock though. Saves me making one. I've done enough stock work lately. When Dan Bartha was still with us I made a bunch of MG-42 stocks for him. Hell of a nice guy.
Everything else is from Dingo. The mag is a repro from Sturmgewehr. And some where I have one side of the mag pouches.
For the time being I think I'll make the bolt. Might as well use a steel one.
BTW, how do I react to that bell icon at the top?
Also the butt stock fits real nice on the receiver. So my bending came out pretty good. Before I installed the barrel I located the sight tower. Drilled 2 holes in the receiver. I'm going to use rivets that I had bought when I built my STEN Mk 3. That was long time ago. They are a perfect fit. But I'm going to cheat and silver solder them in. Would be a real pain to buck them. In any case the gas tube in in.
BTW, I read the thread about the PTR44. Lots of problems apparently with them. Some one doesn't know their metallurgy. It could be that the tempered is fubared. Too brittle. That may be why the ears break off.
I asked Dingo about the carrier I bought from him. He said it is one of the newer ones. There is a parting mark on it but also machining marks. I guess I''ll find out.
Seems to me that 8620 alloy would be ideal for the carrier. A hard outer skin and a tough interior. How often do Garand bolt lugs shear off.
 
Last edited:
BTW, how do I react to that bell icon at the top?
Just click on the bell. Some people have reacted or commented and it will show/take you to them.

I think 8620 should be pretty ideal for a bolt for this. Great work so far!
 
I have the feed problem solved. Turned out it was the feed ramp. I thought it was too small. So I looked at the drawing again. It was. Looking at the end view of the breech I saw that the sides were wider. So I took the barrel back out and hit the sides with a 1/4" sanding drum to match the drawing. I didn't make it deeper just widened up the sides. Polished it up and then reinstalled the barrel. With mag in with dummy rounds it feeds now. From both sides of the mag.
I used the carrier and bolt to chamber the rounds. They don't go in all the way because there is no recessed bolt face. But the right side round did zip right in all the way. I'd still like to move the mag up just a tad. But that can wait until later. Later this week I'll pin the barrel, gas block, and front sight. And that will pretty much complete the barrel work.
Right now I have a 2" chunk of 8620 round stock ready to go on the lathe. But I have to mill the 2 degree angles on each end. Then it goes on the lathe to get 2 different diameters turned on it. Then it's mill time. Probably use my vertical rotary table for some of the milling.
BTW, the AL bolt will lock down into place just like a real one. That is, without a cartridge in front of it. By moving the carrier back and forth the bolt goes into and out of battery.
Here's a pic with the bolt and carrier installed. The carrier is a bit hard to see. But it's in there. Would you guys like to see some pictures of the AL bolt? I do have some that I took when I made the bolt.
Oh, I should add. I caved and bought a trigger and sear from Dingo. I'll use them as patterns for the ones I will make from 4140. Need US parts. The hammer I will make. I'm using the 1944 Mauser pattern for the hammer. And I will be making the grip stick also. Another fun project.
 

Attachments

  • P1020499.JPG
    P1020499.JPG
    84 KB · Views: 46
Last edited:
The barrel, gas block, and front sight are now pinned. And the gas block and front sight line up great. Next up to make is the bolt. Long process.
 
What I do is use the mill and vise. I have a V shaped center finder for round stock. Guess I should post picture of it. It's a very useful tool to have. So when the barrel is in the mill vise I move the vise until the center tool has centered the barrel. Then I use an end mill ground to a point to ride along the top of the barrel at the different points. It's all very simple to do. If you have mill and mill vise. that is.
Ok, so I have the center of the barrel done. I marked the center of the barrel hole. While pressing the barrel in I kept the 2 marks lined up. Once the barrel was pressed in I then installed the gas tube. Then laying the gas block against it I then found the gas hole location. Which I then drilled. The gas block and front sight had their centers marked on them also. So when pressing them on the barrel all I did was keep the marks lined up.
I've used this method with several builds.
I've found that it is imperative that before you attempt a procedure, to stop and think about how you are going to do it. Rushing in can be expensive.
Many times I have parts laying in front of me. I look at them and pick them up and try to figure out how to do what I want to do.
Like now. The MP-44 bolt is sitting on the desk in front of me. Along side of it is the AL bolt. I have what I call the lugs profiled. They will become the hook on top and the sear bent on the bottom. Next up is what I want to do next. Still determining that. BTW it has the 2 degree angle on the bolt face. And the rear is skimmed at that angle. Right now I'm thinking of milling the clearance grooves on the sides of the bolt.
In the meantime I will try to get a picture of the tool I use.
The bolt work can get posted later.
 
Pictures of 2 tools I use to find centers. And a couple of the bolt in it's present stage along side of the AL bolt. BTW in the one picture of the bolt is the VG-1 bolt behind it. Yeah, I'm working on one of them too.
 

Attachments

  • P1020506.JPG
    P1020506.JPG
    82.3 KB · Views: 28
  • P1020508.JPG
    P1020508.JPG
    82.6 KB · Views: 28
  • P1020507.JPG
    P1020507.JPG
    80.9 KB · Views: 29
What do you think it costs you to do the bolt. How are you going to harden the bolt. Will you Rockwell test the hardness.
 
No idea on how much it costs. My time is my own. I never worry about how much something costs to make since I don't sell anything like the bolt. The bolt will be case hardened. It's 8620 alloy. Rc59-61, case depth .030. no more than Rc 46. Probably have a local outfit do the heat treating.
 
A bit later I will add to this. The bolt fun and games. But first I have to talk to Pete if I can. Got a few questions for him. As it is right now the bolt is semi head spaced. Closes on a go gauge but on a no-go not quite. So I will have to weld some spring wire to the sear bent and play again. Reason for the head space problem is I didn't realize that the rear diameter of the bolt needed to be less than the full diameter of the receiver. So I was urinating in the wind trying to head space the bolt.
However right now there is only a very tiny bit of backwards movement when the go gauge is in. Hardy noticeable. Probably better than many well used STG-44's.
 
Now I am not a gunsmith, and this is not gunsmithing advice - in my conversations with Pete he discussed how these rifles with these rounds are very forgiving with respect to headspace. Def recommend you call him to discuss.
 
Back
Top