Gew 98 - Armorers Firing Pin - Won’t Fit

PatickD

Member
Hi guys,

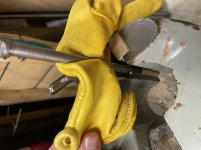
I just purchased a Gew 98 armorers spare firing pin. The firing pin won’t fit the cocking piece of any of my bolts.

See attached, Gew 98 armor’s firing pin, Gew 98 cocking piece:

4F46B649-D7D2-4B2B-AAF9-A393BEEACA9C.jpeg54B28123-270F-4B5A-9E18-064E773BC7FB.jpegB622D2FB-B78C-4692-B7B8-7BCF2F2F5D02.jpeg8AD08931-E48E-4497-8B3D-3B0A9F7F7A3A.jpeg83ED8F36-B077-46A2-9913-FF44D76C5546.jpegD472DEAF-B4F4-49C1-A2CF-0B124F97412D.jpegF622B9DC-935C-4263-A8B2-3786BC6070C7.jpegD68095AE-7058-402B-9C71-3984E37B4CB9.jpegFDB7F8B6-F8B2-4CF3-91CB-0F84C2C719AC.jpeg2DFF9036-35E4-4C31-8A21-3CDA82D3ECC5.jpeg65AC55A8-5B86-4AAE-B973-16246BADAD4C.jpeg48648741-BD36-45D3-96D6-27CE47BF0E1B.jpeg
The cocking piece will fit on. But, will not rotate. The pin appears to be in spec. Minus, a slight bend to the actual firing pin tip.

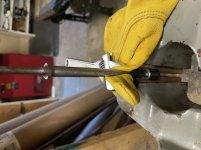
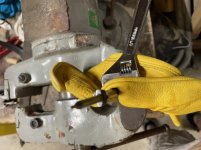
It’s not the cocking piece, I’ve tried the cocking piece with other firing pins. It works fine. See attached, different firing pin, same cocking piece:

4949ECCC-968E-455F-A799-9E87346FFE25.jpeg3E1693F7-C96A-4616-B2B7-C24B0D4C379C.jpeg

I tried a different cocking piece on the armors pin. Same thing, cocking piece will not rotate on the armorers spare.

714BC835-D056-40E7-89B7-627002EA30BF.jpeg

Conclusion: I definitely think the issue lies with the armorers firing pin. Likely the teeth are too big, imo.

Now the question. During WWI did the armors hand fit the spare firing pins to bolts? Did they file down the teeth on the pin? I don’t want to ruin an original piece. But, if filing is acceptable. Then I can do that.

Main question: File to fit?

Thanks for any thoughts,
-Danny
 
It's a common problem when mating a mauser cockpiece to firing pin, it's all in the dimensions/tolerances. I had the exact problem once with an armorer's pin. I carefully mounted the cockpiece in a vice, lubed up the pin lugs, & slowly got the firing pin worked on using a small wrench on the pin. Try not having the cockpiece seated all the way down before turning too to see if that helps it get started. I'd try this before filing...
 
It's a common problem when mating a mauser cockpiece to firing pin, it's all in the dimensions/tolerances. I had the exact problem once with an armorer's pin. I carefully mounted the cockpiece in a vice, lubed up the pin lugs, & slowly got the firing pin worked on using a small wrench on the pin. Try not having the cockpiece seated all the way down before turning too to see if that helps it get started. I'd try this before filing...
That’s what I needed to know! Some “hand fitting required”.

Really good tip, too. Cocking piece in vice block. Lube lugs. Slowly wiggle down with wrench. I will definitely try that first.

I will probably try it on one of my spare cocking pieces. Hopefully that will open up the tolerances on the firing pin lugs. Also, so I don’t ruin my WWI matching cocking piece.

Great advice. Thanks Mike.
 
Just now reading the Storz book. He has an extensive discussion about tolerances and that the Germans never attained true parts interchangeability in WWI. Hand fitting was common.

I suspect close examination will show where the interference is happening. You may see a slight burr if you have applied force. This may require light hand stoning to polish the corner/edge surfaces of the firing pin lugs to get proper fit. May just be one of the lugs or up to all three that may need adjusting. Probably only a few thousandths of an inch needs to be removed. Requires patience. Not a Dremel or bench grinder job.
 
This is a common problem with Mauser parts regardless. Even within parts made by the same manufacturer for the same contract. Once you start mixing manufacturers and time frames, the problem worsens.

If you look at period photographs of the factory's the assemblers would have huge piles of parts in front of them to find one that fit correctly.

Likewise, I would argue, that by definition an armorers part is going to be under or over sized as appropriate to allow for fitting.

Remember, the reason Germans numbered EVERYTHING was due to parts being hand fit, and often times, not interchangeable.

Having manufactured both firing pins and cocking pieces, I can tell you even with today's CNC it is not an easy task.
 
Appreciate all the info guys. I understand hand fitment, and that’s why the Germans numbered every darn part on most of their firearms. Good and bad for us collectors lol.

I just wanted to make sure it was acceptable/normal for me to alter an original part. To get it to fit. Aka, I didn’t want to be bubba, 🤔
 
Is the cocking piece matching numbers to the rifle?
Yes, the entire rifle is matching, including the entire bolt. Only thing not matching is the firing pin. Hence, me with armorers spare.

The one that came with the rifle was probably clipped. Original owner probably got rid of the original matching pin…. Sucks. Current one is completely unmarked pin. Minus a few small letters.
 
given that parts were made on all hand or cam- controlled production machines, in several plants in several countries over several decades its a amazing that any of them fit together!

I put the cocking piece in padded jaws in a vise, pointing up. then using a carefully closed 6” adjustable wrench on the fp flats, turn the pin to & fro to see how far it will twist. if it isnt oily, you could blacken the pin teeth w/magic marker, then try turning, to see where the contact is. I’ve also used fine valve LAPPING compound to remove internal burrs. on a matching rifle, think twice before doing this last bit. the above doesn’t work in every case, I’ve got 5 or 6 cps that just don’t work! but in most cases, it does work. clean completely with spray cleaner to get all the crud out of the cocking piece crevices if you do try lapping compound. then clean it again!
 
Last edited:
Would recommend using some machinists cutting grit.
I use it to loosen up the recoil lug fitting and works wonders.
You do have to put one of the parts in a vise and work it after applying the grit.
The sticker with the grit value fell off long ago but figure 1A, A, or B, should do.

2A = 400 Very Fine
1A = 320 Fine
A = 280 Fine
B = 240 Med. Fine
C = 220 Med. Fine
 

Attachments

  • 20221003_203909.jpg
    20221003_203909.jpg
    341.5 KB · Views: 7
Last edited:
Would recommend using some machinists cutting grit.
I use it to loosen up the recoil lug fitting and works wonders.
You do have to put one of the parts in a vise and work it after applying the grit.
The sticker with the grit value fell off long ago but figure 1A, A, or B, should do.

2A = 400 Very Fine
1A = 320 Fine
A = 280 Fine
B = 240 Med. Fine
C = 220 Med. Fine
that’s the stuff! Widely used in machine shops & factories where they make stuff like bearings. I suggested valve lapping compound (quite similar to product shown) because its available in small tubes at most ‘real’ (as opposed to modern boutique style) auto supplies stores. I favor the finer grades personally.
 
Thanks for the all info/tips guys.

Mike was kind enough to send a photo of how he made his work.

Sure enough, worked without a flaw, from copying his tip.

Took about an hour of wiggling. I just used grease. I started with a WWII refinished cocking piece. Since I didn’t want to bugger up my WWI cocking piece. Almost dropped straight into my WWI one and turned after working it in the WWII one.

Now, I am able to put and take the bolt apart with just my hands.

Was also able to straighten out the firing pin.

Everything was a success with no eye loss.
 

Attachments

  • A6F4554B-9302-4C34-8723-6E19032E3B5E.jpeg
    A6F4554B-9302-4C34-8723-6E19032E3B5E.jpeg
    274.9 KB · Views: 16
  • EB8C9343-C958-4393-91AF-8B8048BB66EC.jpeg
    EB8C9343-C958-4393-91AF-8B8048BB66EC.jpeg
    272.5 KB · Views: 16
  • F0A3409A-A204-4AD5-976E-86E1A60BB0E1.jpeg
    F0A3409A-A204-4AD5-976E-86E1A60BB0E1.jpeg
    276.3 KB · Views: 16
Thanks for the all info/tips guys.

Mike was kind enough to send a photo of how he made his work.

Sure enough, worked without a flaw, from copying his tip.

Took about an hour of wiggling. I just used grease. I started with a WWII refinished cocking piece. Since I didn’t want to bugger up my WWI cocking piece. Almost dropped straight into my WWI one and turned after working it in the WWII one.

Now, I am able to put and take the bolt apart with just my hands.

Was also able to straighten out the firing pin.

Everything was a success with no eye loss.
Glad you got it working Danny! Part of the fun of things like this. Lol.
 
Back
Top